Recording Electron application - CukeTest itself
Since CukeTest itself is developed with Electron, here the automation script for generating CukeTest is recorded directly through Electron.
Quick Start Electron Application Recording
Create an empty project
Just create an empty project and select the Windows template.
Configuring Web Recording
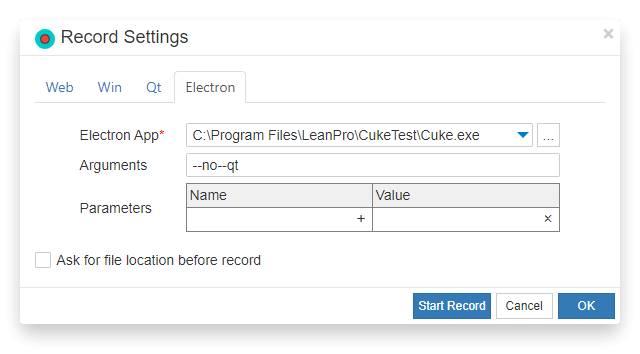
Open the Web Recording button drop-down box and select Recording Settings. Set the following values respectively:
- Type: select Electron.
- Electron application: select the executable file of CukeTest, the default path is
C:\Program Files\LeanPro\CukeTest\Cuke.exe. - Command line parameters: It is recommended to add the parameter "--no-qt".
The final interface is as follows:
Start recording
Before starting the test, you need to restore the scaling of CukeTest to the actual size (set in the View menu). If the application under test cannot be scaled, you can force the scaling by specifying the command line parameter -force-device-scale-factor=1.
Click the "Start Recording" button to start recording CukeTest operations.
Note that some off-page application actions will not be recorded. For example, clicking on the "Open File" button can be recorded, but the actions in the file selector after the click cannot be recorded and require handwritten scripts (see Electron Recording Limitations for details). You can avoid recording such operations if you want the recorded script to be immediately replayable.
View sample code
The complete sample code for this walkthrough is included in the CukeTest sample. The internal interface of Electron is obtained by recording, and the automation of external interfaces ( such as file dialogs ) is done by Windows automation recognition.