Walkthrough: Create Web Automation from Recording
In this exercise, we will demonstrate how to use the CukeTest automation tool to automate testing for a small ERP system, covering the entire process from recording to scenario creation, parameterization, and data-driven testing.
Through this introduction, participants can gain initial understanding of:
- Recording for web automation testing
- Development of Behavior-Driven Development (BDD) framework
- Writing and implementing test scenarios
- Parameterization and data-driven testing
Preparation
Environment Setup
Start the ERP demo system (included in CukeTest): In the CukeTest main window, go to the Tools menu, click on Start Web Sample -> DemoErp, and open the ERP application in your local browser. The default username is admin and the password is admin. Copy the URL.
Project Creation
Open CukeTest and create a project using the "Basic" template with the name "orders". The "Basic" template provides feature files and pytest-bdd format code related to web interface testing.

Rapid Development
Designing the Workflow
The All Orders page in the ERP system after login is the feature module to be tested in this session. By observing this simple page, we can quickly design a basic test workflow, consisting of four steps:
- Accessing the order management platform: The most basic login operation. It should allow logging in with different accounts.
- Order entry: Automatically fill out the form and submit it.
- Verifying the result of order entry: Check if the order has been correctly entered.
- Deleting the order: Remove the specified order.
Recording Web Operations
After designing the test cases, we can use the recording feature of CukeTest to record the steps in the test cases as automation scripts. You can try to record a complete operation process at once, including:
- Logging in
- Creating a new order
- Filling out the order
- Deleting the order
Recording a closed-loop automation process has many benefits, the most obvious being the ability to repeat the run, with each run deleting the newly created test data (step 2).
Now, all you need to do is start recording and manually perform the above workflow.
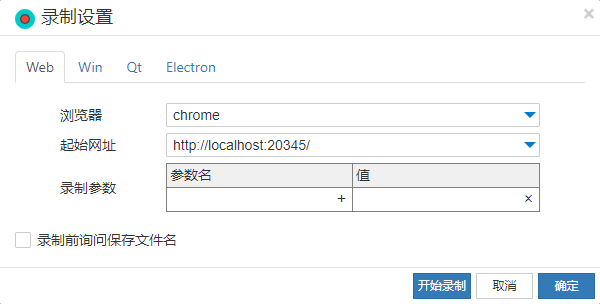
First, click on the recording settings on the main interface, and fill in the URL of the webpage to be tested (or leave it blank and manually enter it in the browser address bar after starting recording), then you can start recording.

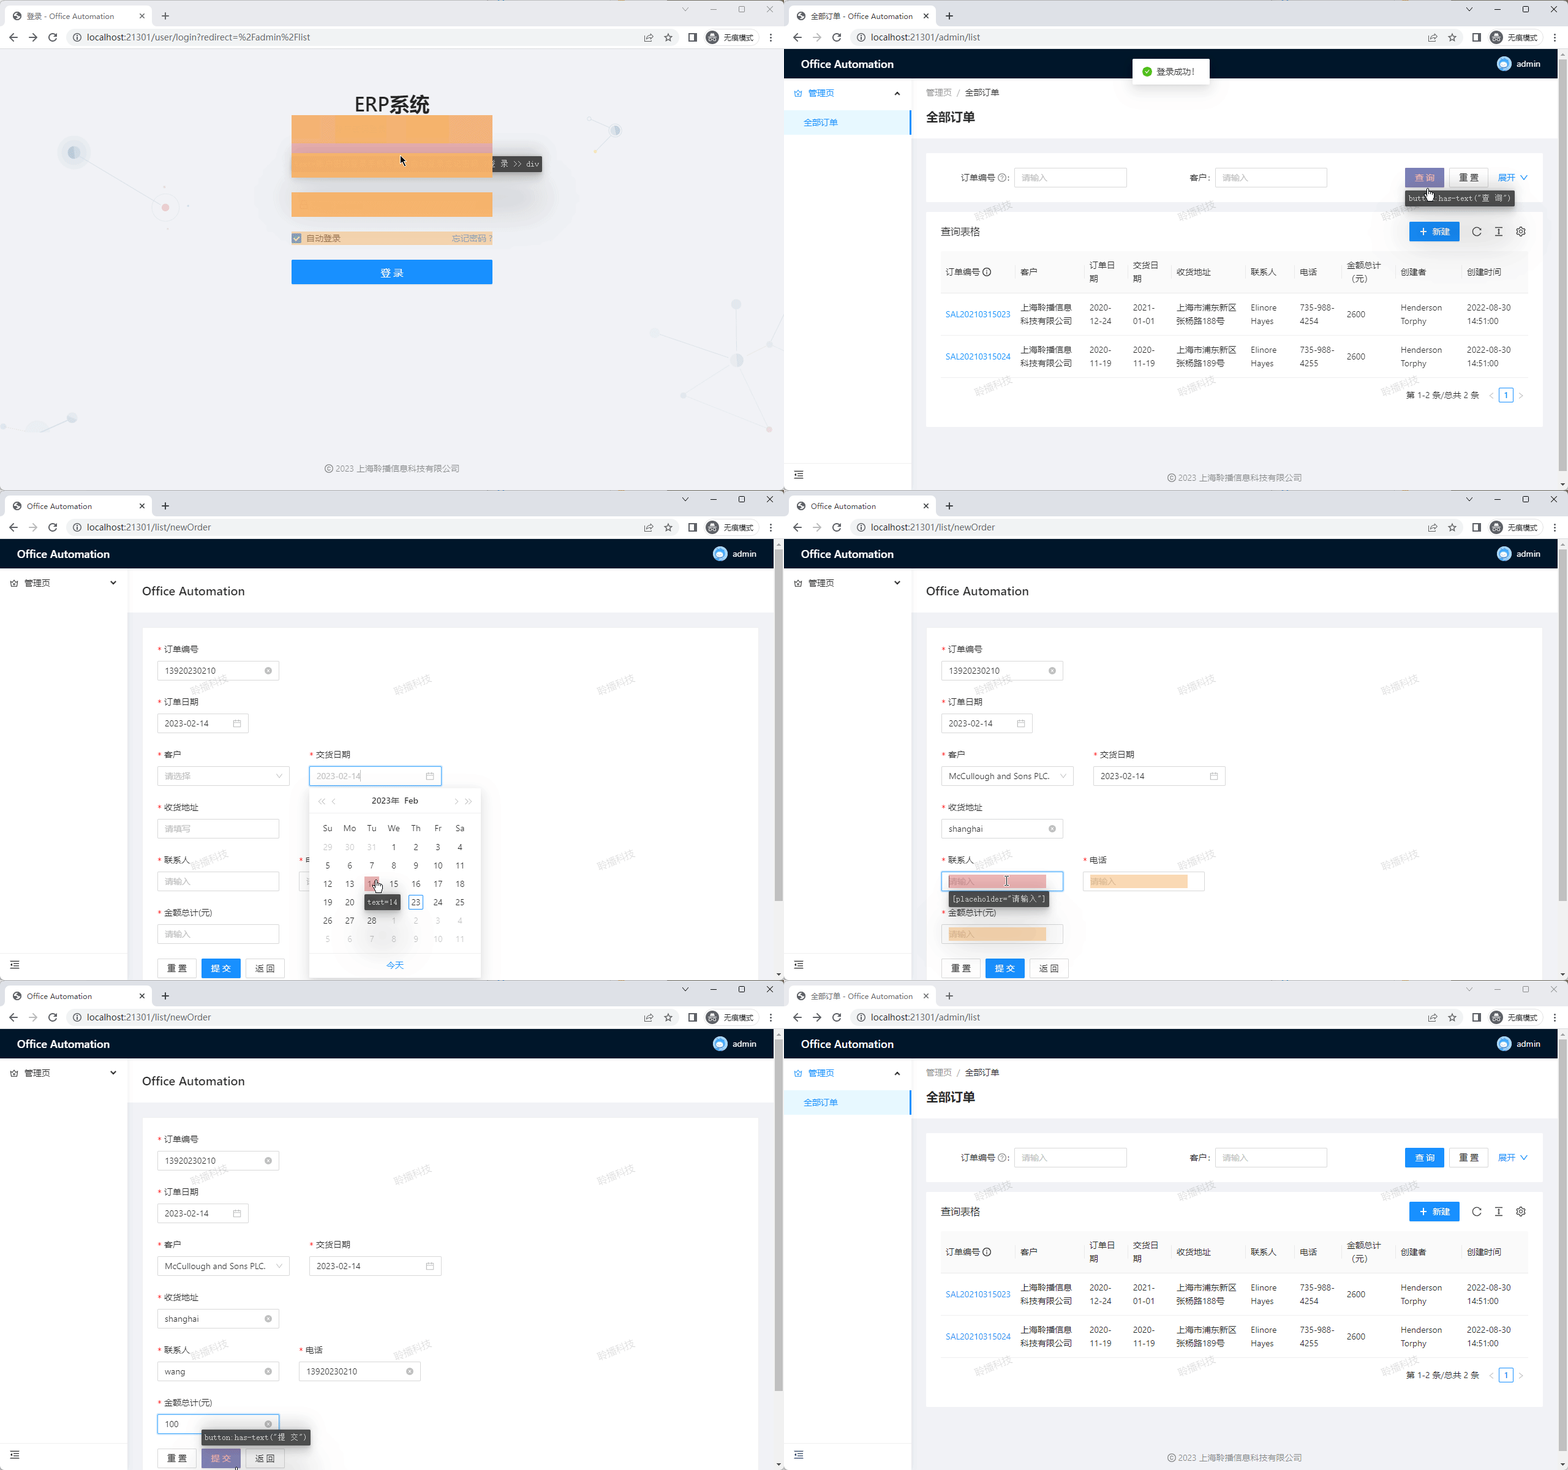
Once in recording mode, hovering over elements on the page will display their selector Selector, and the area of the element will be highlighted with a red background. Any actions performed on this element will be recorded and generate corresponding operation code, whether it's mouse clicks or keyboard inputs.
The recording interface looks like this:

After completing the workflow, we will obtain a piece of code like this (comments have been edited for brevity):
from leanproWeb import WebAuto

def run(webauto: WebAuto) -> None:
    browser = webauto.chromium.launch(headless=False)
    context = browser.new_context()
    # 访问主页
    page = context.new_page()
    page.goto("http://localhost:20345/")
    # 执行登录
    page.goto("http://localhost:20345/user/login")
    page.click("[placeholder=\"用户名: admin or user\"]")
    page.fill("[placeholder=\"用户名: admin or user\"]", "admin")
    page.press("[placeholder=\"用户名: admin or user\"]", "Tab")
    page.fill("[placeholder=\"密码: admin\"]", "admin")
    with page.expect_navigation():
        page.click("button:has-text(\"登 录\")")
    # 新建订单
    page.click("button:has-text(\"新建\")")
    page.click("[placeholder=\"请输入订单编号\"]")
    page.fill("[placeholder=\"请输入订单编号\"]", "13920230210")
    page.click(".ant-picker")
    page.click("text=22")
    page.click("input[role=\"combobox\"]")
    page.click(":nth-match(:text(\"Harber Group and Sons.\"), 2)")
    page.click("text=客户Harber Group and Sons.Harber Group and Sons.交货日期 >> [placeholder=\"请选择\"]")
    page.click("tbody div:has-text(\"23\")")
    page.click("[placeholder=\"请填写\"]")
    page.fill("[placeholder=\"请填写\"]", "shanghai")
    page.click("[placeholder=\"请输入\"]")
    page.fill("[placeholder=\"请输入\"]", "wang")
    page.click("#phone")
    page.fill("#phone", "11234553334")
    page.click("#total")
    page.fill("#total", "100")
    page.click("button:has-text(\"提 交\")")
    # 删除订单
    page.click("text=123456")
    page.click("button:has-text(\"删除\")")
    # 关闭页面
    page.close()
    context.close()
    browser.close()

with WebAuto() as webauto:
    run(webauto)
The generated script from recording can be directly replayed by clicking on "Run Script". If you need to slow down the replay speed to observe the operation process, you can specify a slowMo property in the chromium.lauch() method, measured in milliseconds (ms):
browser = webauto.chromium.launch(headless=False,slow_mo=2000)Code Improvement
After completing the previous phase, we have a piece of executable Python code, which can perform specific scenario tests. However, the recorded code can only execute a predetermined sequence of operations, making it inconvenient to make flexible adjustments to the execution process. Moreover, its usage is not efficient enough, as it cannot utilize different parameters during the testing process.
So, how can we avoid these issues and better accomplish the automation testing task?
To address this problem, we suggest managing scripts with scenarios, which requires organizing scripts in a certain format to match scenarios. Organizing the recorded scripts in this way has the following benefits:
- Using scenarios for management ensures that the testing project won't become chaotic as it grows. Each scenario and each step are isolated, preventing data confusion internally.
- Further splitting into steps allows for parameterization and data-driven testing.
- Various hooks can be used to insert operation scripts at specific times during execution, such as screenshot capture, cleanup, validation, etc.
- After execution, a report can be generated, presenting all results and information in charts for engineers to easily review the testing situation.
Next, we'll proceed with 3 steps to implement this:
- Format Refactoring
- Parameterization Handling
- Implementing Data-Driven Approach
Format Refactoring
For readers familiar with testing methods, you may have noticed that this format is actually the format of Behavior Driven Development (BDD) testing. Therefore, the first step is to transform the initially defined test workflow into a script file:
Open the script file feature1.feature in the project and write test cases for these scenarios:
- Login
- Create a new order
- Fill out the order
- Delete the order
When editing test cases, you can click on the top right corner of the script area to switch CukeTest to text mode and directly copy the following code into it.
# language: zh-CN
功能: ERP订单自动录入
从excel表中读取订单数据并自动录入,将执行结果导出到excel

  场景: 进入订单管理平台
    假如打开网址"DemoErp"样例
    那么输入用户名"admin",密码"admin",登录账号导航到指定页面

  场景: 订单录入
    那么点击“新建”按钮,读取excel文件"./support/order.xlsx",根据"SAL20210315026"将订单数据录入到系统

  场景: 删除订单
    假如删除订单"SAL20210315026"
In the "Order Entry" scenario, due to the large amount of data required to be filled in the form, the data is maintained in an Excel file and read out when filling in the form.
Create a conftest.py file. In pytest, this file is a global configuration file used to define global fixtures, as well as some custom settings and plugins. In GUI automation testing, we typically place the startup and shutdown of the application under test, as well as the initialization of the test environment, here. The content is as follows:
from leanproWeb import WebAuto
from auto.sync_api import sync_auto
import base64

browser = WebAuto().__enter__().chromium.launch(headless=False)
context = browser.new_context()
page = browser.new_page()

def pytest_sessionfinish(session):
    browser.close()
    context.close()
    page.close()


def pytest_bdd_after_scenario(request, feature, scenario):
...test_feature1.py file and manually write corresponding test case functions for each scenario, ensuring compliance with the pytest-bdd structure guidelines:
from pytest_bdd import scenarios, given, when, then, parsers
import pytest
from conftest import page

scenarios("../features")

@given('打开网址DemoErp样例')
def goto_home():
    page.goto("http://localhost:20345/")

@then(parsers.parse('输入用户名"{username}",密码"{password}",登录账号导航到指定页面'))
def login(username, password):
    page.goto("http://localhost:20345/user/login")
    page.click("[placeholder=\"用户名: admin or user\"]")
    page.fill("[placeholder=\"用户名: admin or user\"]", "admin")
    page.press("[placeholder=\"用户名: admin or user\"]", "Tab")
    page.fill("[placeholder=\"密码: admin\"]", "admin")
    with page.expect_navigation():
        page.click("button:has-text(\"登 录\")")

@then(parsers.parse('点击“新建”按钮,读取excel文件"{xlsx_file}",根据"{order_no}"将订单数据录入到系统'))
def new_order(xlsx_file, order_no):
    page.click("button:has-text(\"新建\")")
    page.click("[placeholder=\"请输入订单编号\"]")
    page.fill("[placeholder=\"请输入订单编号\"]", "123456")
    page.click(".ant-picker")
    page.click("text=22")
    page.click("input[role=\"combobox\"]")
    page.click(":nth-match(:text(\"Harber Group and Sons.\"), 2)")
    page.click("text=客户Harber Group and Sons.Harber Group and Sons.交货日期 >> [placeholder=\"请选择\"]")
    page.click("tbody div:has-text(\"23\")")
    page.click("[placeholder=\"请填写\"]")
    page.fill("[placeholder=\"请填写\"]", "上海市")
    page.click("[placeholder=\"请输入\"]")
    page.fill("[placeholder=\"请输入\"]", "张三")
    page.click("#phone")
    page.fill("#phone", "11234553334")
    page.click("#total")
    page.fill("#total", "100")
    page.click("button:has-text(\"提 交\")")

@given(parsers.parse('删除订单"{order_no}"'))
def delete_order(result, order_no):
    page.click("text=123456")
    page.click("button:has-text(\"删除\")")
Run the Project & Get the Report
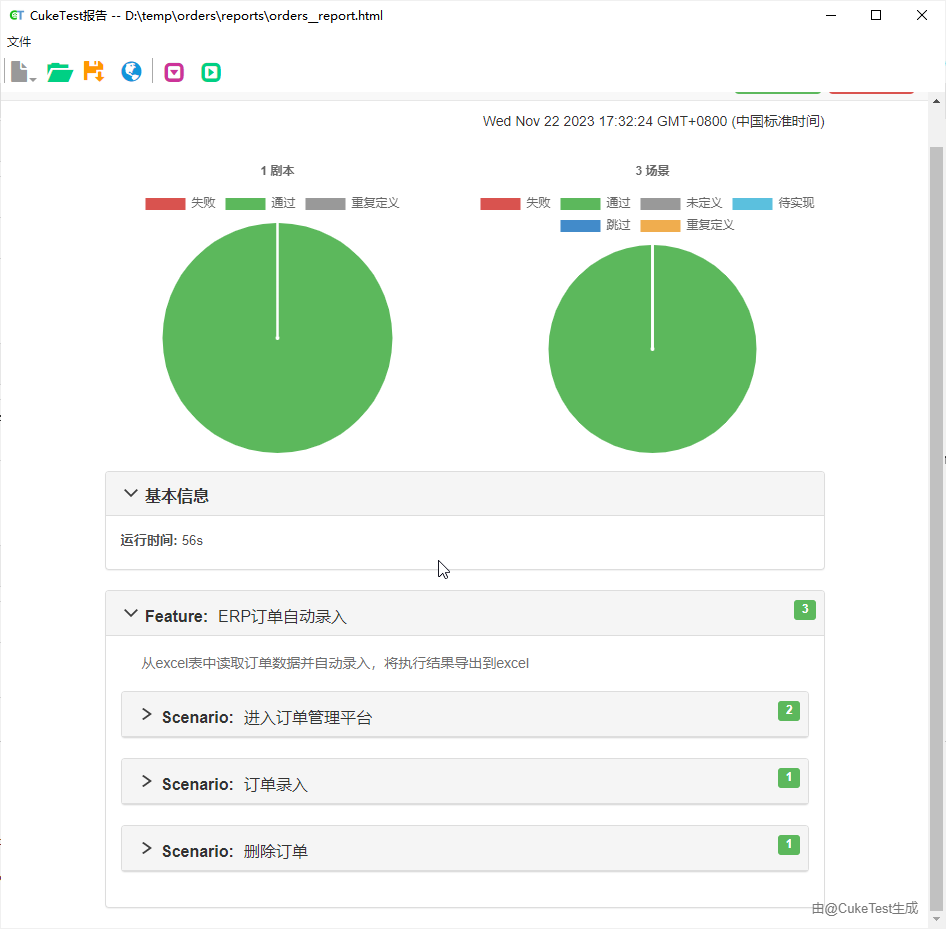
Once the recorded scripts are placed into the new step definition script, the project can be run. Clicking the "Run Project" button on the interface will start the project smoothly, with no change in the executed operations. However, upon completion, a run report is generated as shown below:

This report provides detailed records of the results and status of each step, and can be expanded to view more specific information.
Parameterization
Although the project is currently runnable and generates corresponding run reports, this does not mean the task is complete. In fact, we are very close to achieving the final goal.
Upon careful observation of the scripts defined in the above steps, we noticed the use of placeholders such as {username}. These placeholders allow us to pass specific values dynamically, rather than hardcoding them in the tests. parsers.parse is a powerful tool that can flexibly parse and retrieve these values, and fill in the corresponding parameters in functions. The parsed parameters will be dynamically passed to the respective functions, providing high flexibility and maintainability for test cases.
@then(parsers.parse('输入用户名"{username}",密码"{password}",登录账号导航到指定页面'))
def login(username, password):
    page.goto("http://localhost:20345/user/login")
    page.click("[placeholder=\"用户名: admin or user\"]")
    page.fill("[placeholder=\"用户名: admin or user\"]", username)
    page.press("[placeholder=\"用户名: admin or user\"]", "Tab")
    page.fill("[placeholder=\"密码: admin\"]", password)
    with page.expect_navigation():
page.click("button:has-text(\"登 录\")")[placeholder="Username: admin or user"] and [placeholder="Password: admin"] with the id selectors of the respective input fields. This can be written as:
@then(parsers.parse('输入用户名"{username}",密码"{password}",登录账号导航到指定页面'))
def login(username, password):
    page.goto('http://localhost:21216/user/login')
    page.click("#username")
    page.fill("#username", user)
    page.click('#password')
    page.fill('#password', pwd)
    with page.expect_navigation():
        page.click("button:has-text(\"登 录\")")
Additional Source of Parameters
Now that we understand the meaning of parameters in step descriptions, let's return to the "Create Order" step. Since this step requires filling in a large amount of data into the form, if all this data is written directly into the step, the step will become very long and difficult to reuse.
Therefore, here we choose to store the complete data in an Excel file (alternatively, you can choose a txt file or csv file); this way, only an index value needs to be introduced into the step description. Here, we choose "Order Number" for this purpose. To achieve this, we need to write scripts for reading Excel files and indexing data based on order numbers:
data = read_xlsx(xlsx_file)
target_order = find_order(order_no, data)
Here,
xlsx_fileis the path to the Excel file,order_nois the order number. Thedataobtained is all the data in the Excel, andtarget_orderis the data of the target order.
Incorporating this into the existing step definitions, it can be written as:
@then(parsers.parse('点击“新建”按钮,读取excel文件"{xlsx_file}",根据"{order_no}"将订单数据录入到系统'))
def new_order(xlsx_file, order_no):
    data = read_xlsx(xlsx_file)
    target_order = find_order(order_no, data)

    page.click("button:has-text(\"新建\")")
    page.click("[placeholder=\"请输入订单编号\"]")
    page.fill("[placeholder=\"请输入订单编号\"]", target_order["订单编号"]) # 填写订单编号
    page.click('input#orderDate') # 填写订单日期
    page.fill('input#orderDate', format_excel_time(target_order["订单日期"])) # 直接填写日期,formatExcelTime()用于处理Excel日期格式与表单格式的差异。
    page.press('[placeholder="请选择"]', 'Enter')
    page.click("input[role=\"combobox\"]") # 选择客户
    page.click(":nth-match(:text(\"{0}\"), 2)".format(target_order["客户"]))
    page.click('#deliveryDate') # 填写交货日期
    page.fill('#deliveryDate', format_excel_time(target_order["交货日期"])) # // 直接填写日期,formatExcelTime()用于处理Excel日期格式与表单格式的差异。
    page.press('[placeholder="请选择"]', 'Enter')
    page.fill("[placeholder=\"请填写\"]", target_order["收货地址"]) # 填写收货地址
    page.fill("[placeholder=\"请输入\"]", target_order["联系人"]) # 填写联系人
    page.fill("#phone", target_order["电话"]) # 填写电话
    page.fill("#total", str(target_order["金额总计(元)"])) # 填写金额总计

    page.click("button:has-text(\"提 交\")")
The
read_xlsx()method andformat_excel_time()are custom functions in the example. For specific function implementations, you can refer to theutils.jsfile in theorderssample.
At this stage, the most difficult step has been taken, and the project is now very complete. However, to truly replace the testing work and improve testing efficiency, the final step of improvement is needed —— data-driven testing.
Implementing Data-Driven Testing
Both testing requirements and daily work demands require the ability to enter multiple orders. We introduce the Scenario Outline feature for this purpose.
The Scenario Outline is a special type of scenario that uses a Example Table to run automatically based on the parameters in the table. See Scenario Outline for details. Here are the steps:
- Right-click on the title of the scenario "Order Entry" and select "Change Scenario Type" => "Scenario Outline": At this point, the parameters in the steps will be summarized into a table, which we call the Example Table, which is the basis for running the Scenario Outline.
(Optional) Update the parameter names in the steps and example table: To make the steps and data table more readable, you can change the default
param*parameter names to appropriate names:- Change "param2" to "orderNo" in the step text and table title.
- Delete the
param1column.Since the Excel file path is fixed, you can delete the
param1column to reduce the number of example table maintenance.
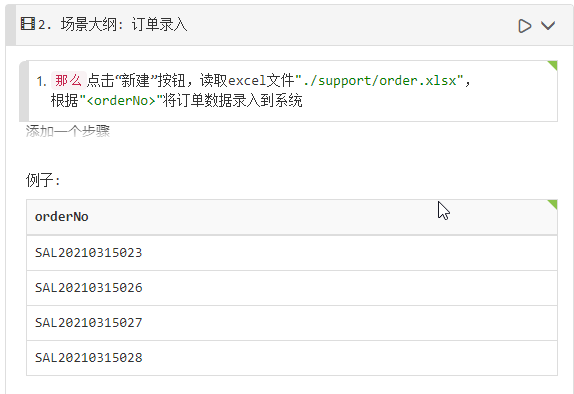
Fill in more data: Add more data rows to the example table. Double-click on the table body, press the Tab key until you navigate to a new row, and then fill in some new data. After editing, the entire scenario looks like this:

You can also click on the text mode in the script area to switch CukeTest to the text interface, and directly copy the following code:
  场景大纲: 订单录入
    那么点击“新建”按钮,读取excel文件"./support/order.xlsx",根据"<orderNo>"将订单数据录入到系统
    例子:
      | orderNo        |
      | SAL20210315023 |
      | SAL20210315026 |
      | SAL20210315027 |
      | SAL20210315028 |
At this point, if you run the project again, you can see the results of the batch-generated scenarios:

Now, you can complete the entry of any number of orders by adding content to the example table, truly freeing your hands.
Ensuring Correctness
Of course, whether replacing repetitive work with automation or ensuring software quality with automated testing, it is necessary to ensure the correctness of the operations. This requires us to add more code, including:
- Verify the order entry result: Orders that should be entered must be successfully entered; orders that should not be entered must fail to enter.
- Verify the order deletion result: Only the target order should be deleted, and unrelated orders should not be deleted.
- Capture screenshots or videos for record: Record the entire running process, and since web automation operations are relatively fast, screenshots can also be taken at the end of each scenario and displayed in the report.
For the implementation of the first two features, you can refer to the source code in the orders sample for details. The third feature can be quickly accomplished using the API provided by CukeTest.
Screenshots and Videos
Screenshots and recordings are helpful for UI testing, as they ensure that testers are confident that automation is performing the expected tasks.
If you wish to capture a browser screenshot at the end of a scenario, you can easily do so using the After Hook provided by CukeTest on the left "Toolbox" tab. Drag "PyTest" -> "pytest_bdd_after_scenario" to an empty space in the step definition, then add the control screenshot operation. Use request.attach() to add the screenshot as an attachment to the report. The code looks like this:
# conftest.py
def pytest_bdd_after_scenario(request, feature, scenario):
    # TODO: 附件到报告
    screenshot = page.screenshot()
    screen = base64.b64encode(screenshot).decode('utf-8')
    request.attach(screen, "image/png")
Recording the screen is even simpler. In CukeTest, you can also record a video during test execution by enabling the "Record Video" option in the "Run Configuration".
Conclusion
Software testing is crucial for ensuring software quality and directly impacts the assessment of software quality. As ERP systems grow in business scale, they become large and complex software with intricate processes. Ensuring their quality and implementing automation become challenging tasks, and CukeTest is a tool designed to tackle these challenges.