Walkthrough: Create Test Automation Script for Windows Apps
Recording Python scripts with CukeTest
1. Project Creation
- Open CukeTest and click on "File" -> "New Project".
- Set "NotepadTesting" as the project name, choose Python as the language, select the "Windows" project template, specify the project path, and then click on "Create" to create the project.

2. Start Recording Script
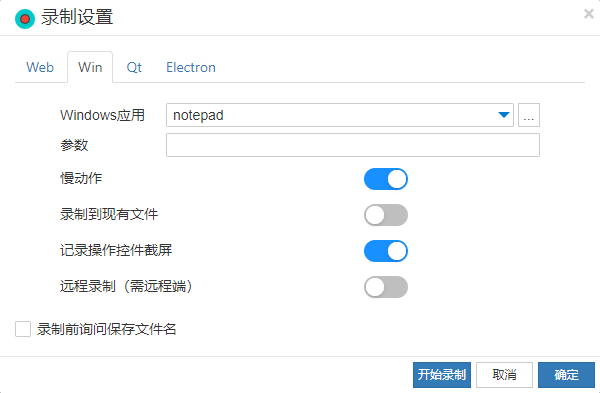
Click on the recording settings in the main interface and fill in the path of the application to be tested (or leave it blank and start the application by selecting "Start Application" in the toolbar after recording has started). Here we use the built-in Windows application "notepad", so simply fill in "notepad" to start recording.

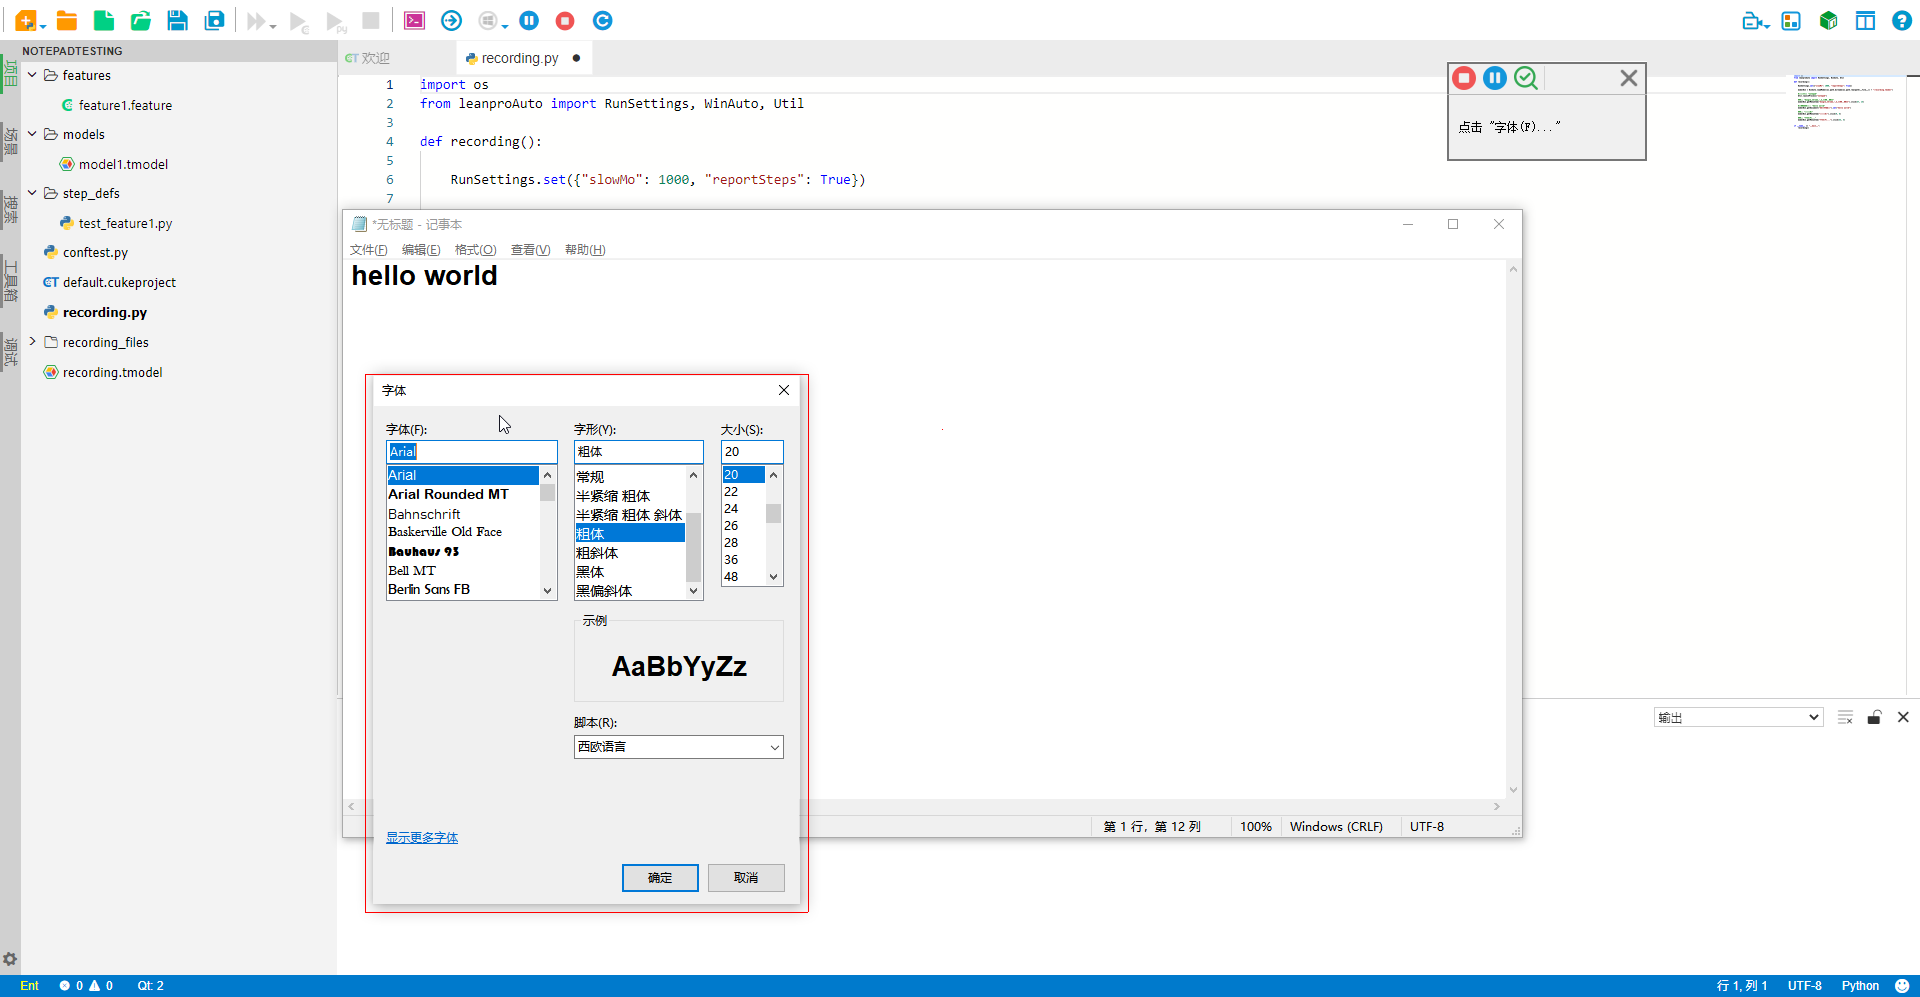
Here, we will record a scenario of interacting with the Notepad dialog:
- Enter the text "hello world" in Notepad.
- Select Format -> Font.
- Choose "Arial" from the Font dropdown.
- Choose "Bold" from the Font style dropdown.
- Choose "5" from the Size dropdown.
- Click OK to close the Font dialog.
- Click on File -> Save.
- Save the file as "helloworld.txt" in the project path.
The recording interface looks like this:

Add Checkpoints
In automated testing, checkpoints are a crucial part of verifying whether the application state meets expectations. In CukeTest, you can quickly add checkpoints during the recording process. Here are the specific steps:
Open the Checkpoint Dialog Quickly: While recording, you can quickly open the checkpoint dialog by holding down the Alt key and right-clicking on the target control. This feature allows you to add verification steps in real-time while performing actions, improving the efficiency of writing test scripts.
Add Property Checkpoints: For this test case, we will add a property checkpoint to verify the text in the text editor. In the "Property Checkpoints" list, select the "Text.text" property (whose value should be "hello world"), which is the target property we want to verify.

- Add Image Checkpoints: Simply switch to the image checkpoint tab and check the images that need to be verified. This type of checkpoint is used to verify the appearance of specific images on the application interface, making it ideal for testing scenarios focused on visual elements. Here, we are verifying whether the font settings have been changed successfully.

- Confirm and Insert Checkpoint Scripts: After selecting the properties to be verified, click the Confirm button. The corresponding checkpoint script will be inserted into our recording script.
You can continue operating the tested application, and because the recording has started, all actions will be synchronized to generate automation scripts, which can be seen in the editor. When all operations are completed, click the "Stop" button on the toolbar to finish recording an automation script. The recorded script looks like this:
import os
from leanproAuto import RunSettings, WinAuto, Util

def recording():

    RunSettings.set({"slowMo": 1000, "reportSteps": True})

    modelWin = WinAuto.loadModel(os.path.dirname(os.path.realpath(__file__)) + "/recording.tmodel")

    #启动应用 "notepad"
    Util.launchProcess("notepad")

    #设置控件值为 "hello world"
    modelWin.getDocument("文本编辑器").set("hello world")

    #点击 "格式(O)"
    modelWin.getMenuItem("格式(O)").click(10, 9)

    #点击 "字体(F)..."
    modelWin.getMenuItem("字体(F)...").click(38, 7)

    #选择列表项 "Arial"
    modelWin.getList("字体(F):1").select("Arial")

    #选择列表项 "粗体"
    modelWin.getList("字形(Y):1").select("粗体")

    #选择列表项 "20"
    modelWin.getList("大小(S):1").select("20")

    #点击 "确定"
    modelWin.getButton("确定").click()

    #检查属性
    modelWin.getDocument("文本编辑器").checkProperty("Text.text", "hello world")

    #检查截屏图片
    modelWin.getVirtual("文本编辑器_image").checkImage()

    #点击 "文件(F)"
    modelWin.getMenuItem("文件(F)").click(23, 11)

    #点击 "保存(S)"
    modelWin.getMenuItem("保存(S)").click(74, 7)

    #设置控件值为 "helloworld.txt"
    modelWin.getEdit("文件名:1").set("helloworld.txt")

    #点击 "关闭"
    modelWin.getButton("关闭").click()


if __name__ == "__main__":
    recording()
3. Run the Recorded Script
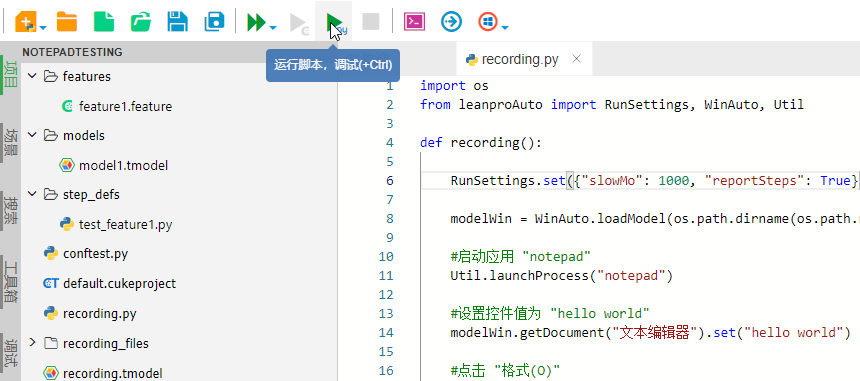
Click on the toolbar to switch the CukeTest view to Script Only mode, then click on "Run Script":

Integrating Automated Test Cases with Code
The above operation only records the automation steps, which means it can only replay the operation steps. It is not yet considered testing because the testing script needs to have assertion parts in addition to the testing operations, which verify the results of the testing operations.
Now let's combine the recorded script with automated testing.
1. Create Application Model
The code generated from recording needs to rely on the model file used during recording. Therefore, before integrating the code, it is necessary to create the model file required for this test. Here, you can directly use the recorded model, copy it to the models directory, and rename it to model1.tmodel.
If there are already existing model files in the project, you can open both the existing model file and the newly recorded model file. Then, by dragging the root node of the newly recorded model into the existing model tree, you can copy the model. Next, right-click on the copied node and select "Merge into sibling node" to complete the model merge. This way, you can use the newly recorded control objects in the existing model.
Additionally, you can choose "Record to existing model" during recording, which will directly save the new control objects to the existing model, further simplifying the integration process.
2. Write Test Scenario
Open the .feature file in the directory and use natural language to write business scenarios corresponding to the just-recorded test. This is an important step to make the test more readable and easier to manage. Here, we set all recorded operations into two scenarios, "Edit Content and Save" and "Change Notepad Font":

Next, switch the script editing mode to Text mode, paste the following content, and then switch back to Visual mode:
For more information on how to use the "Visual" view to edit feature files, refer to Exercise: Editing Feature Files
Corresponding content in the Text view is:
# language: zh-CN
功能: 自动化记事本应用
以记事本为例,讲解在自动化测试Windows桌面应用的时候,如何解决菜单下拉问题。
比如: 记事本的【格式】--【字体】,【文件】--【保存】

  场景: 编辑内容并保存
    当在记事本中输入文本"hello world"
    并且点击【文件】--【保存】
    同时在文件对话框中保存为项目路径中的"helloworld.txt"
    那么文件应该保存成功

  场景: 更改记事本字体
    当点击【格式】--【字体】
    并且从【字体】下拉框中选择"Arial"
    并且从【字形】下拉框中选择"粗体"
    并且从【大小】下拉框中选择"五号"
    同时单击【确定】按钮以关闭【字体...】对话框
    那么字体应该设置成功
3. Modify conftest.py
conftest.py is a configuration file dedicated to storing fixtures. pytest automatically recognizes and loads it. In CukeTest, we place operations such as starting and closing the application under test, as well as initializing the test environment, in this file.
Open the conftest.py file in the root directory and modify the application launch path app_path and the model file path. After modification, the content of conftest.py is as follows:
# conftest.py
from leanproAuto import Util
import os
import shutil

app_path = "notepad"

# 设置保存文件的测试缓存路径
projectPath = os.getcwd() + '\\testcache\\'
context = {}

# 等效于 BeforeAll Hook,在第一个测试开始前被调用
def pytest_sessionstart(session):
    context["pid"] = Util.launchProcess(app_path)

    # 清理缓存文件夹
    if os.path.exists(projectPath):
        shutil.rmtree(projectPath)
    os.mkdir(projectPath)


# 等效于 AfterAll Hook,在所有测试结束后被调用
def pytest_sessionfinish(session):
    Util.stopProcess(context["pid"])
This code accomplishes several tasks:
- Application Path: Defines the path of the Windows application being tested.
- Cache Path: Defines the path to the cache folder.
- Model Loading: Loads the model file mentioned earlier, which is crucial for UI automation testing.
- Before Test Session: Launches the Windows application being tested and clears the cache folder.
- After Test Session: Closes the application being tested.
With these configurations, our test environment is fully prepared to execute the automation test scripts.
4. Write Step Definitions
Open the test_feature1.py file located in the step_defs directory and write the step definition code.
Copy the recorded code according to the sequence of operation steps and paste it into the test_feature1.py file, making the necessary modifications.
After modification, the test_feature1.py file looks like this:
assertis a built-in assertion library in Python, used to add checkpoints in the script. You can refer to Checkpoints Guide for more information.checkPropertycan be used to easily verify properties of GUI elements. Passing data between steps can be achieved usingtarget_fixture.
# test_feature1.py
from leanproAuto import WinAuto, Util
from pytest_bdd import scenarios, given, when, then, parsers
import pytest
import os

model = WinAuto.loadModel("models/model1.tmodel")
scenarios("../features")

# 定义缓存目录
projectPath = os.getcwd() + '\\testcache\\'

# target_fixture用来将text值传递给上下文
@when(parsers.parse('在记事本中输入文本{text}'), target_fixture="texts")
def enter_text(text):
    model.getDocument("文本编辑器").set(text)

    # 校验文本是否设置成功
    model.getDocument("文本编辑器").checkProperty("value", text)
    return text

@when('点击【文件】--【保存】')
def click_save():
    model.getMenuItem("文件(F)").click()
    model.getMenuItem("保存(S)").invoke()

@when(parsers.parse('在文件对话框中保存为项目路径中的{filename}'), target_fixture="filepaths")
def enter_filename(filename):

    # 保存到缓存路径
    filepath = projectPath + filename
    model.getEdit("文件名:1").set(filepath)
    model.getButton("保存(S)1").click()
    Util.delay(2000)
    return filepath

@then('文件应该保存成功')
def saved_successfully(texts, filepaths):
    Util.delay(2000)
    filepath = filepaths
    exist = os.path.exists(filepath)

    # 添加断言
    assert exist == True
    print(filepath + "文件已创建")

# 更改记事本字体
@when('点击【格式】--【字体】')
def click_font():
    model.getMenuItem("格式(O)").click()
    model.getMenuItem("字体(F)...").invoke()

@when(parsers.parse('从【字体】下拉框中选择{font}'))
def select_font(font):
    model.getComboBox("字体(F):").select(font)
    Util.delay(500)

@when(parsers.parse('从【字形】下拉框中选择{weight}'))
def select_weight(weight):
    model.getComboBox("字形(Y):").select(weight)
    Util.delay(500)


@when(parsers.parse('从【大小】下拉框中选择{size}'))
def select_size(size):
    model.getComboBox("大小(S):").select(size)
    Util.delay(500)


@when('单击【确定】按钮以关闭【字体...】对话框')
def close_dialog():
    model.getButton("确定").click()
    Util.delay(500)


@then('字体应该设置成功')
def font_set_successfully(request):

    #检查截屏图片
    model.getVirtual("文本编辑器_image").checkImage()
Execution
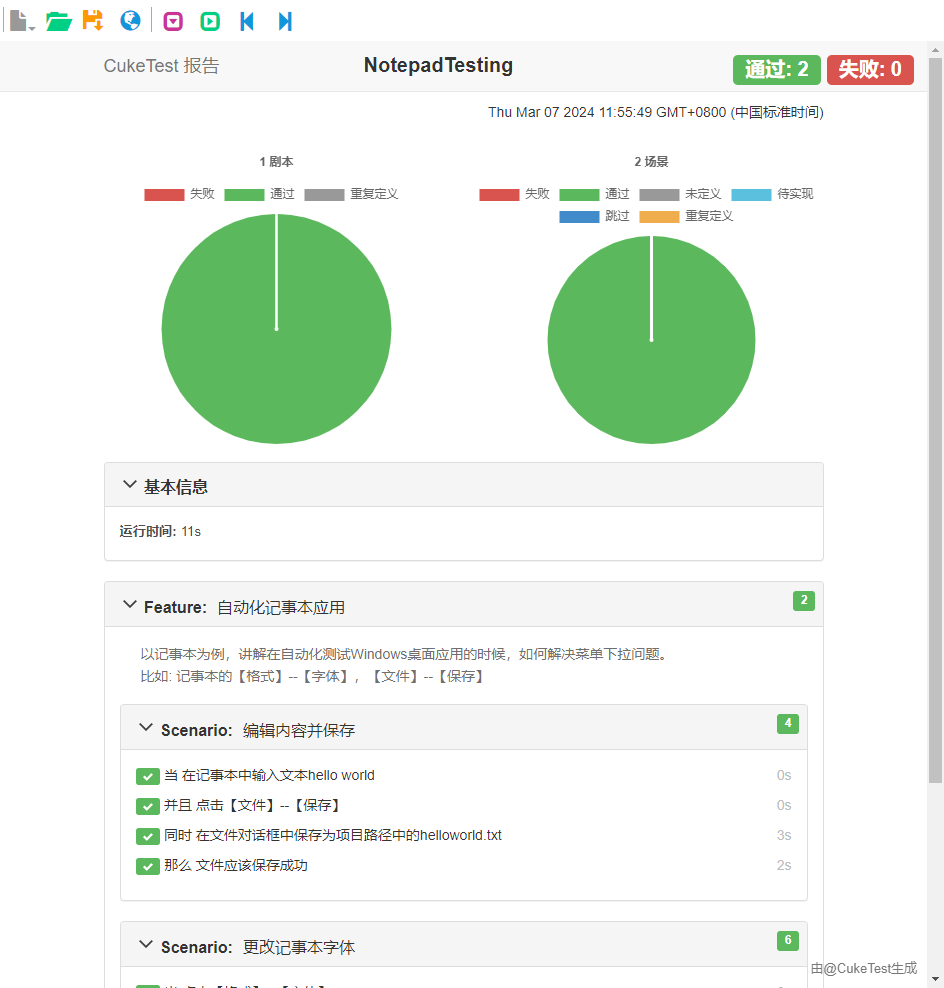
Click on Run Project, you can see the corresponding test report generated after the automation execution is completed.
