Walkthrough: Create Web Automation from Recording
1. Project creation
First open the CukeTest client and create the project. Note that the project template is the Web template, not Selenium Web. The former uses Web recording to generate scripts, while the latter requires handwritten scripts.

After the project is created, the home page of the project will automatically open.
2. Start recording script
You can directly click the [Record] button in CukeTest to record, or you can configure the recording of Web-related functions in [Recording Options];
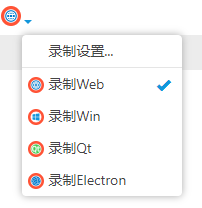
Open [Recording Settings...]
The starting website uses the test page provided by CukeTest (Internet connection is required): https://cuketest.github.io/apps/shopping/
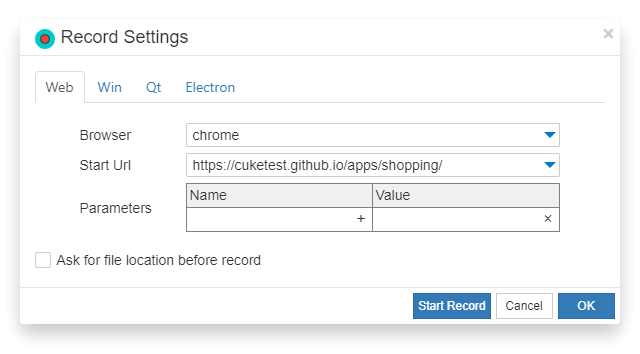
Click [Start Recording] to record; We are going to record a scene of submitting a form:
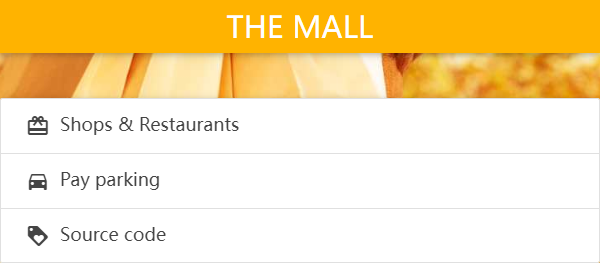
- On the homepage of Mall website, click on the [Pay parking] link to the Payment page
- Enter the corresponding credit card data in the form (of course, the format will not be verified, and it will not be submitted), and click [Pay] to submit.
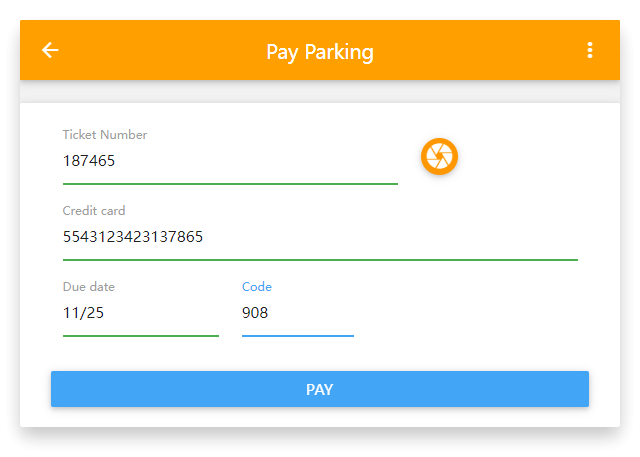
- The system will jump to the order page, and the submitted data can be displayed on the order page
Click [Stop Recording] after recording

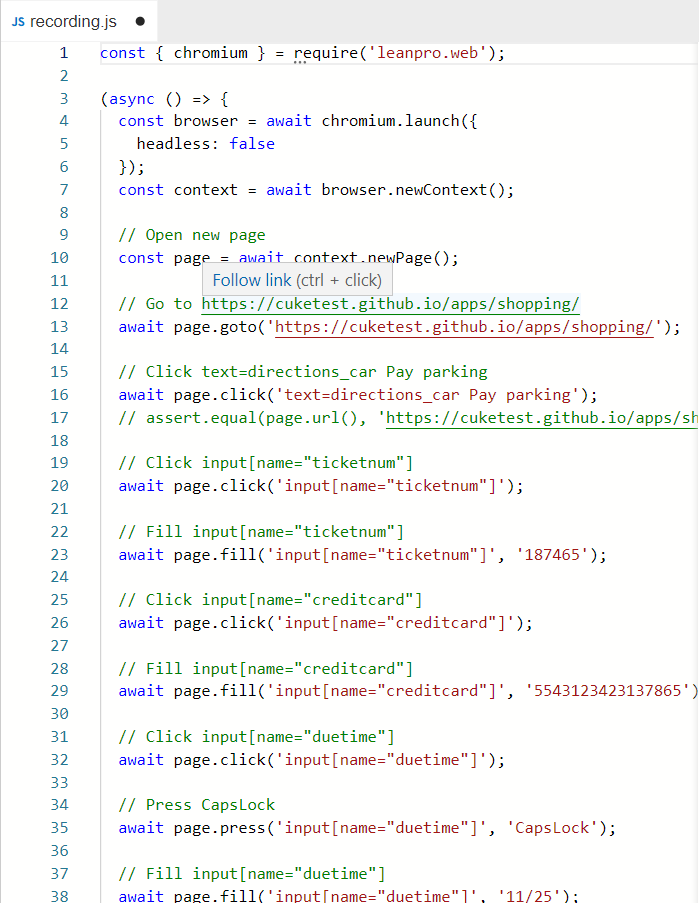
Then return to CukeTest to see the automated script that has been generated.
3. Run the recorded script
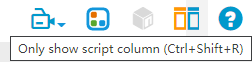
Click on the toolbar [Display script column only] to switch the CukeTest view to Display script column only, and click [Run script]:
You can see that the script just recorded can be run automatically.
Integrate automated test cases and code
The above operation only records the automated operation part, that is, it can only play back the operation steps, and cannot be regarded as a test, because in addition to the test operation, the test script also needs an assertion part, that is, to verify the result of the test operation.
The following will combine the recorded script with automated testing.
1. Write use case scenarios
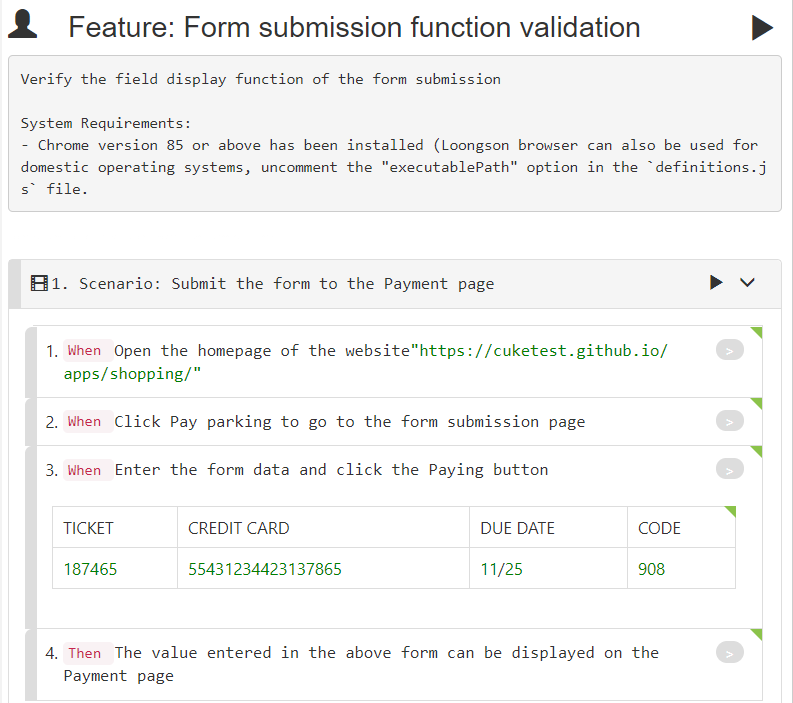
Open the .feature file in the directory and write the business scenario corresponding to the test operation just now in natural language. This is an important step to make the test more readable and easier to manage:
Next, you can switch the editing mode of the script to the [text] mode, copy the following content into it, and then switch back to the [visual] mode:

# language: zh-CN
Function: form submission function verification
Verify the field display function submitted by the form
Scenario: Submit the form to the Payment page
If you open the homepage of the website "https://cuketest.github.io/apps/shopping/"
When clicking Pay parking to the form submission page
When entering the form data, click the Paying button
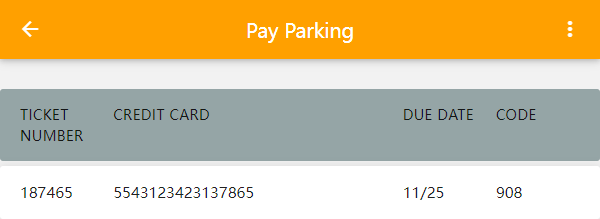
| TICKET | CREDIT CARD | DUE DATE | CODE |
| 187465 | 55431234423137865 | 11/25 | 908 |
Then the value entered in the above form can be displayed on the Payment page
The table in the third step is added by right-clicking the step and selecting [Add Table]. The data table in the step is used to pass more complex key-value type data to the step. For details, you can click to view Data Table .
2. Generate code samples
Open the definitions.js file in the definitions directory and click the gray button behind each step in the script to generate corresponding code samples in the definitions.js file.
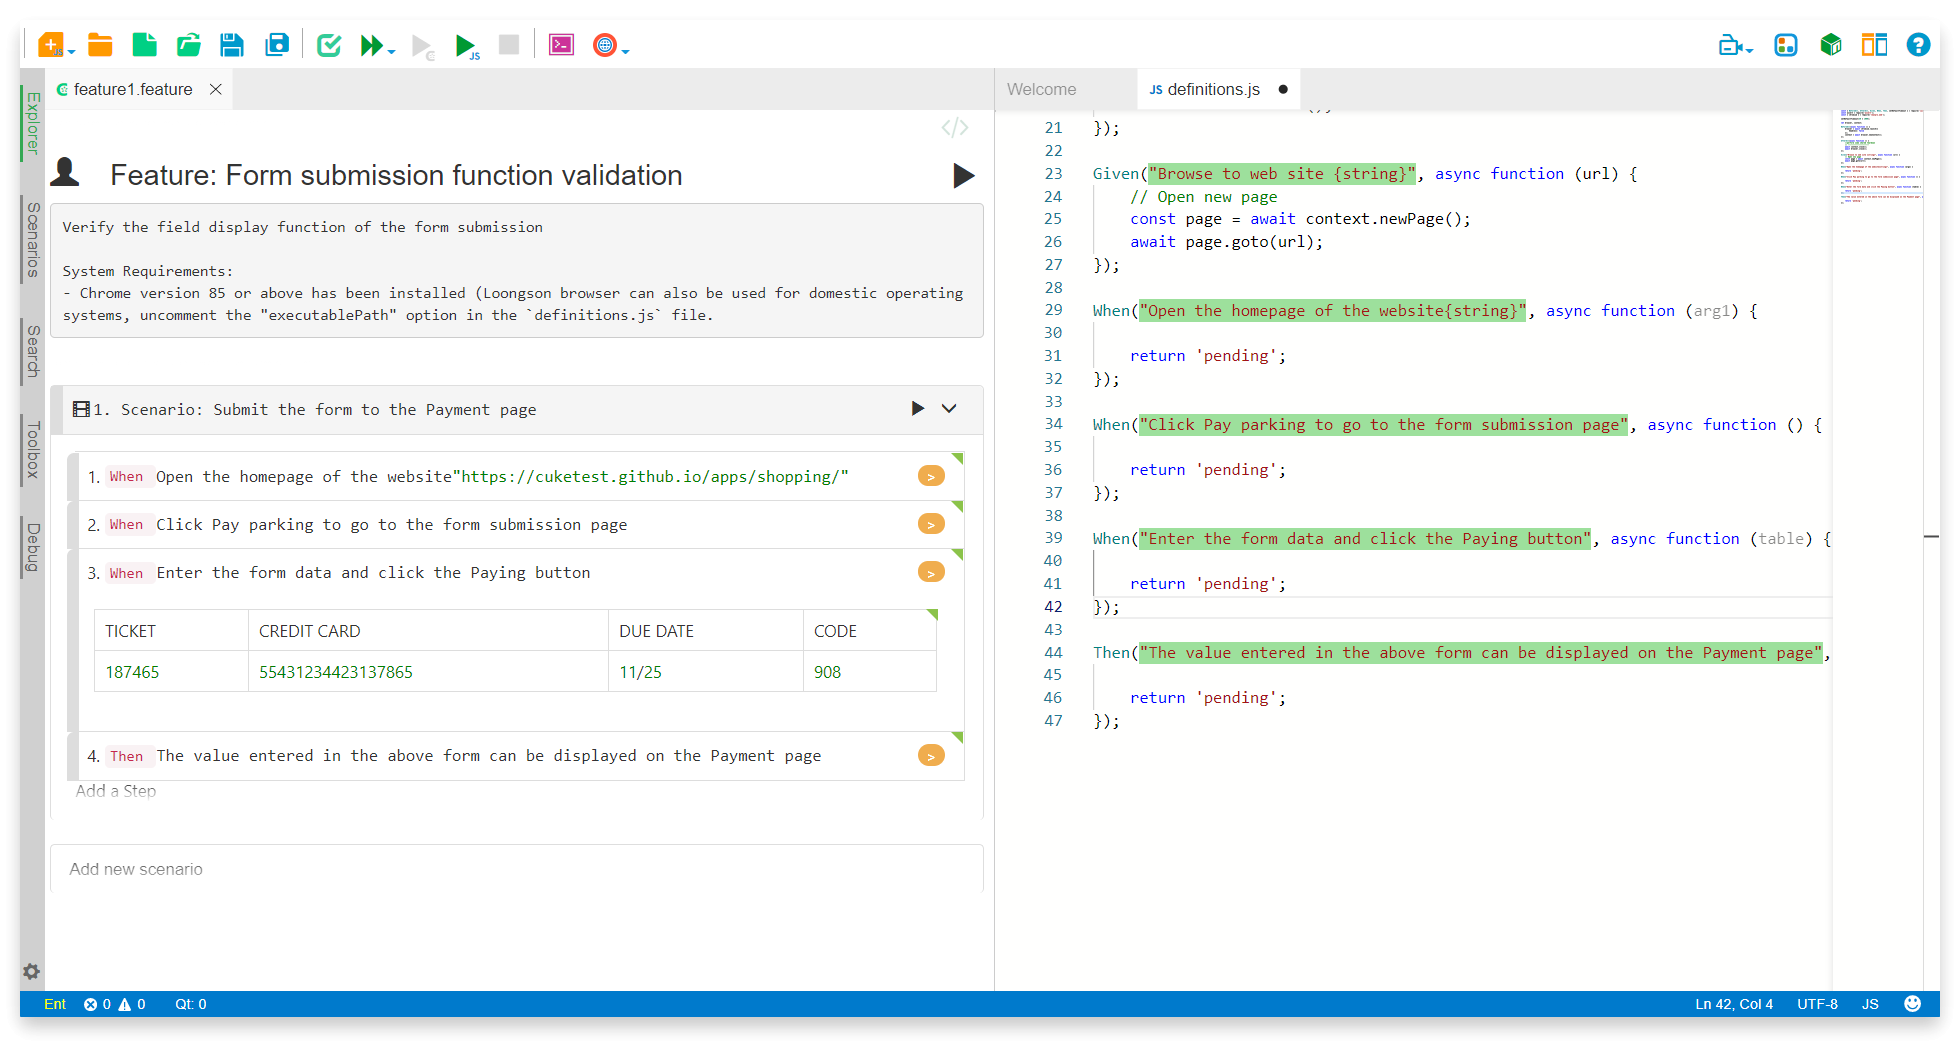
Copy the recorded code to the definitions.js file in the order of the operation steps, and make the corresponding modifications.
Open the website homepage code after modification
// The page variable is also used in other operation steps and is defined as an external variable
let page;
Given("Open the homepage of the site{string}", async function (url) {

    // Open new page
    page = await context.newPage();

    // Go to https://cuketest.github.io/apps/shopping/
    await page.goto(url);
});
The
pagevariable is defined externally because this variable will be used in many of the next steps, and the variable in each step is independent (like a function).
The data entered in the form needs to be used as verification data in the next operation step, and the variables corresponding to these data are set as external variables;
let ticketNum,creditCard,dueDate,code;
When("Enter the form data, click the Paying button", async function (table) {
    // Get the value in the table
    const tableData = table.hashes()[0];

    ticketNum = tableData['TICKET'];
    creditCard = tableData['CREDIT CARD'];
    dueDate = tableData['DUE DATE'];
    code = tableData['CODE'];

    // Fill input[name="ticketnum"]
    await page.fill('input[name="ticketnum"]', ticketNum);

    // Fill input[name="creditcard"]
    await page.fill('input[name="creditcard"]', creditCard);

    // Fill input[name="duetime"]
    await page.fill('input[name="duetime"]', dueDate);

    // Fill input[name="code"]
    await page.fill('input[name="code"]', code);

    // Click button[type="submit"]
    await page.click('button[type="submit"]');
});
Assert the result:
Then("The value entered in the above form can be displayed on the Payment page", async function () {
    assert.equal(ticketNum, await page.innerText('[data-label="Ticket Number"]'));
    assert.equal(creditCard, await page.innerText('[data-label="Credit card"]'));
    assert.equal(dueDate, await page.innerText('[data-label="Due Date"]'));
    assert.equal(code, await page.innerText('[data-label="Code"]'));
});
Complete script
After integrating the recording script with the script, the content of the entire definitions.js script file is as follows:
const {Util} = require('leanpro.common');
const {BeforeAll, AfterAll, Given, When, Then} = require('cucumber');
const assert = require('assert');
const {chromium} = require('leanpro.web');

let browser, context;

BeforeAll(async function () {
    browser = await chromium.launch({
        headless: false
    });
    context = await browser.newContext();
});

AfterAll(async function () {
    // Clean up the session, close the browser
    // ---------------------
    await context.close();
    await browser.close();
});

// The page variable is also used in other operation steps and is defined as an external variable
let page;
Given("Open the homepage of the site{string}", async function (url) {

    // Open new page
    page = await context.newPage();

    // Go to https://cuketest.github.io/apps/shopping/
    await page.goto(url);
});

When("Click Pay parking to go to the form submission page", async function () {

    // Click text=/.*Pay parking.*/
    await page.click('text=/.*Pay parking.*/');
    // assert.equal(page.url(),'https://cuketest.github.io/apps/shopping/pagar-estacionamento.html');

});
let ticketNum,creditCard,dueDate,code;
When("Enter the form data, click the Paying button", async function (table) {
    // Get the value in the table
    const tableData = table.hashes()[0];

    ticketNum = tableData['TICKET'];
    creditCard = tableData['CREDIT CARD'];
    dueDate = tableData['DUE DATE'];
    code = tableData['CODE'];

    // Fill input[name="ticketnum"]
     await page.fill('input[name="ticketnum"]', ticketNum);

     // Fill input[name="creditcard"]
     await page.fill('input[name="creditcard"]', creditCard);

     // Fill input[name="duetime"]
     await page.fill('input[name="duetime"]', dueDate);

     // Fill input[name="code"]
     await page.fill('input[name="code"]', code);

     // Click button[type="submit"]
     await page.click('button[type="submit"]');
});
Then("The value entered in the above form can be displayed on the Payment page", async function () {

     assert.equal(ticketNum, await page.innerText('[data-label="Ticket Number"]'));
     assert.equal(creditCard, await page.innerText('[data-label="Credit card"]'));
     assert.equal(dueDate, await page.innerText('[data-label="Due Date"]'));
     assert.equal(code, await page.innerText('[data-label="Code"]'));
});
carried out
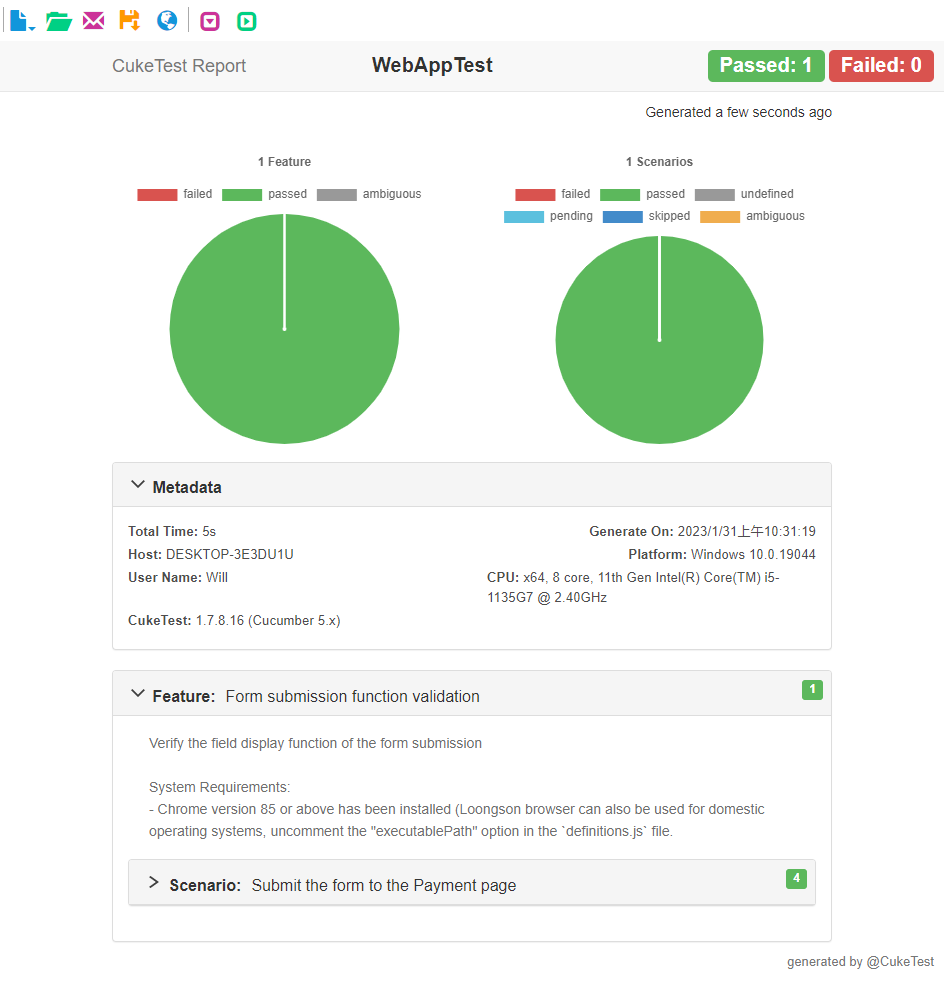
Click [Run Project], you can see that the corresponding test report is generated after the automated execution is completed.
Chinese version click here.