Record Dialog
CukeTest supports recording and playback of operations for a wide range of technologies and can generate automation scripts by recording operations that can be played back at any time and from anywhere to complete automated operations or automated testing tasks.
The technologies currently supported are :
Before starting the first recording, first click on "Recording..." in the toolbar (default is "Record Web") in the drop-down box to open the corresponding dialog box for recording-related configuration.
Web Recording Options
The following recording options are available
Browser
Select the type of browser used for recording, the type will vary depending on your installation package and platform:.
- Windows platform currently supports Chrome (Chromium), Firefox browser recording.
- Linux platform supports lbrowser and Chrome (Chromium) browser.
Chrome and lbrowser will automatically use the version already installed on the system. Firefox uses the built-in version of Firefox 92 in CukeTest for recording.
If the browser you need is not in the recording options, you can finish recording with other supported browsers and then modify the recording code to use other browsers instead.
In addition to the browser, you can also select the Electron type application. When Electron is selected, other options will change accordingly, see Electron recording options for details
Start URL
That is, the default URL visited when recording starts. If it is not written then an empty page opens by default and you need to manually enter the URL in the address bar.
Web recording parameters
The startup parameters that will be passed to the browser when recording the startup, such as viewport-size parameter can specify the size of the window, the default value is 1280,720, that is, only in the 1280x720 range to display the contents, beyond the range of the contents need to move the scroll bar to view. The options and parameters are explained in the following table, the value of the specified option does not need to be quoted.
| Option Name | Parameter Name | Option explanation |
|---|---|---|
| color-scheme | Theme Color | Simulate the preferred color scheme, "light" or "dark" |
| geolocation | Geolocation | Specify the geographic coordinates, such as "37.819722,-122.478611" |
| lang | Language / Region | Specify the language/region setting, such as "zh-CN" |
| proxy-server | Proxy Server | Specify a proxy server, such as “http://myproxy:3128” or “socks5://myproxy:8080” |
| timezone | Time Zone | Time zone to be simulated, such as "Europe/Rome" |
| timeout | Timeout | Timeout time of the action in milliseconds (default value: "20000") |
| viewport-size | Viewport size | Specify the browser window size in pixels, such as "1280, 720" |
| user-agent | User Agent | Specify the user agent string |
Ask for the save file name before recording
When unchecked, each recording will automatically generate a script file with a default file name; when checked, the user will be asked for the file name where the script is saved before each recording.
Qt recording options
Qt Applications
The executable file of the Qt application being manipulated will be started automatically at the beginning of the recording, or you can leave it unfilled and start it manually via the menu "Tools" -> "Start Qt Application" after the recording starts. Both of these methods will generate the corresponding Qt application startup script.
If you open the Qt application first and then start recording, no script related to starting the application will be generated.
Command line parameters
The command line parameter to use when starting the target application.
slowMo
Increase the interval time of each operation during playback, after opening it, it will add slowMo option to the generated script, the default is 1000, i.e. 1 second interval for each operation in playback.
This is reflected in the script as the following settings:
const { RunSettings } = require("leanpro.common");
RunSettings.slowMo = 1000;
Recording to existing models
Writes the control model generated by the operation to the selected model file *.tmodel instead of generating a new model file.
Screenshot of the record operation control
Screenshots of the manipulated control are generated and can be viewed by clicking on each control in the Model Manager (the container of the manipulated control is not screenshotted). This can be used to quickly locate the manipulated control by viewing the control screenshot while debugging.
Ask for the save file name before recording
When unchecked, each recording will automatically generate a script file with a default file name; when checked, the user will be asked for the file name where the script is saved before each recording.
Windows recording options
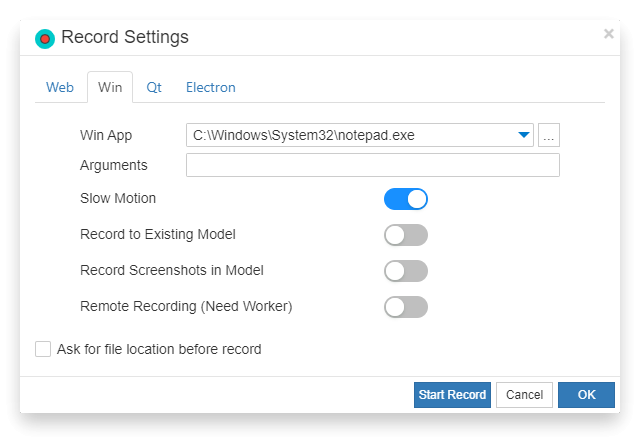
Ability to record desktop application actions in Windows to generate automation scripts. Select the Win tab in the Recording Options dialog to configure the options related to Windows recording.

Windows Application
The path to the Windows application, the target is usually the executable *.exe, or it can be a batch file *.bat.
Command line parameters
The command line arguments used to start the target application are used to pass in some of the parameters used for supply purposes, such as the notepad application, which can be passed in a text file path (such as some_text_file.txt), with the same effect as running it from the command line:
notepad.exe some_text_file.txt
slowMo
Increase the interval time of each operation during playback, after opening it, it will add slowMo option to the generated script, the default is 1000, i.e. 1 second interval for each operation in playback.
This is reflected in the script as the following settings:
const { RunSettings } = require("leanpro.common");
RunSettings.slowMo = 1000;
Recording to existing models
The control model generated by the operation is written to the selected model file *.tmodel instead of generating a new model file.
Ask for the save file name before recording
When unchecked, each recording will automatically generate a script file with a default file name; when checked, the user will be asked for the file name where the script is saved before each recording.
Electron recording options
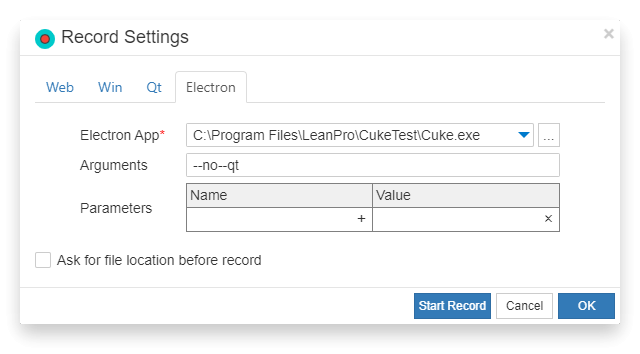
Electron recording options and Web recording options share a single recording options dialog box. You can refer to the Web Recording dialog box Web Recording Settings dialog box. Select Electron in the Type of the dialog box to set the recording options for Electron.
CukeTest provides a number of setup options for Electron recording to apply to Electron test recording in a variety of different situations. These options are not identical to the Web recording options, some are derived from the Web recording options, and some are unique to Electron.
Electron Application
That is, the excutable-path property of the launch() method specifies which Electron executable to use to launch and start recording.
Command line parameters
The startup parameters used to pass to the Electron application. As an example, to use electron -v to view the version, you need to enter the path to Electron in the Electron application field, enter -v in the command line parameters, and start recording.
Recording parameters
In addition to the parameters included in Web Recording, two new environment variables env and working directory cwd have been added:
- env: environment variable, which is used to specify the environment variable in which the Electron application is launched, is a JSON object.
- cwd: Working directory, used to specify the working directory from which the Electron application will be launched, and from which the target application will be treated as having been launched. This parameter can be set if the application has requirements for the working directory.
- color-scheme: Refer to Web Recording Parameters
- geolocation: Refer to Web Recording Parameters
- locale: Refer to Web Recording Parameters
- timeout: Refer to Web Recording Parameters
- timezone: Refer to Web Recording Parameters
Ask for the save file name before recording
When unchecked, each recording will automatically generate a script file with a default file name; when checked, the user will be asked for the file name where the script is saved before each recording.