Pytest-BDD使用指南
在CukeTest中,我们为您提供了内置的pytest-bdd支持,包含对中文剧本的支持。为了使您的自动化测试过程更加轻松,CukeTest还附带了多种项目模板和示例。这意味着,您可以非常方便地创建pytest-bdd项目并立即开始运行。借助这些模板和示例,无论您是初学者还是经验丰富的测试人员,都能迅速地上手并充分利用pytest-bdd的强大功能。
Pytest BDD 是基于 Python 的 pytest 测试框架开发的行为驱动开发(BDD)框架。它巧妙地融合了 pytest 的简洁强大与 Gherkin 语言的直观表达,为 Python 测试提供了一种高效的方式。
与许多其他的 BDD 工具不同,pytest-bdd 无需额外的运行器,并完美融入 pytest 的生态,允许单元测试与功能测试在同一框架下进行,简化了持续集成服务器的配置,并且允许测试设置的重用。
pytest-bdd中,你编写的pytest fixtures(即用于单元测试的预设条件和操作),可以通过依赖注入的方式重用于功能步骤中。这意味着你可以在不需要维护包含Gherkin命令式声明副作用的上下文对象的情况下,实现对需求的恰到好处的规格说明。这种方法让测试更加简洁高效,因为它避免了重复设置测试环境的需要,并且使得测试用例的编写和需求的沟通更加直接和清晰。
简单来说,pytest-bdd允许你用一种接近自然语言的方式来编写测试用例,这些测试用例可以直接对应到你的项目需求上。这种方式使得非技术背景的人员也能理解测试用例的内容,并参与到软件开发过程中。
例子
这是一个测试博客托管软件的示例:
# content of publish_article.feature

Feature: Blog
    A site where you can publish your articles.

    Scenario: Publishing the article
        Given I'm an author user
        And I have an article

        When I go to the article page
        And I press the publish button

        Then I should not see the error message
        And the article should be published  # Note: will query the database
请注意,每个
.feature文件中只允许定义一个Feature。这是为了保证测试的清晰度和组织性。当我们使用Gherkin语法编写测试时,虽然一个功能(Feature)下可以有多个不同的场景(Scenario)来描述该功能的各种情况,但我们不应该在同一个.feature文件中混合描述多个不同的主要功能。这样做可以使每个功能都有一个明确、专注的上下文,有助于管理和维护测试文件。
# content of test_publish_article.py

from pytest_bdd import scenario, given, when, then

@scenario('publish_article.feature', 'Publishing the article')
def test_publish():
    pass


@given("I'm an author user")
def author_user(auth, author):
    auth['user'] = author.user


@given("I have an article", target_fixture="article")
def article(author):
    return create_test_article(author=author)


@when("I go to the article page")
def go_to_article(article, browser):
    browser.visit(urljoin(browser.url, '/manage/articles/{0}/'.format(article.id)))


@when("I press the publish button")
def publish_article(browser):
    browser.find_by_css('button[name=publish]').first.click()


@then("I should not see the error message")
def no_error_message(browser):
    with pytest.raises(ElementDoesNotExist):
        browser.find_by_css('.message.error').first


@then("the article should be published")
def article_is_published(article):
    article.refresh()  # Refresh the object in the SQLAlchemy session
    assert article.is_published
Scenario 装饰器
使用 scenario 装饰器的函数就像一个普通的pytest测试函数,函数内的部分会在所有场景步骤执行完毕后运行。
from pytest_bdd import scenario, given, when, then

@scenario('publish_article.feature', 'Publishing the article')
def test_publish(browser):
    assert article.title in browser.html
不过,我们建议尽可能将您的逻辑只放在“Given”、“When”、“Then”步骤中,这样可以使测试更加结构化和清晰。
步骤别名
有时,为了更好的可读性,人们必须使用不同的名称声明相同的 fixture 或步骤。为了使用多个步骤名称与同一步骤函数,只需多次装饰它即可:
@given("I have an article")
@given("there's an article")
def article(author, target_fixture="article"):
    return create_test_article(author=author)
请注意,给定的步骤别名是独立的,并且在剧本中使用时被执行。
例如,是否将你的资源关联到某个拥有者。管理员用户不能成为文章的作者,但文章应该有一个默认作者。
Feature: Resource owner
    Scenario: I'm the author
        Given I'm an author
        And I have an article


    Scenario: I'm the admin
        Given I'm the admin
        And there's an article
步骤参数
通常可以通过给步骤添加参数来重用步骤。这允许有单一实现和多重使用,因此代码更少。还可以在单个场景中两次使用相同的步骤并使用不同的参数!甚至更多,您可以使用几种类型的步骤参数解析器 (灵感来自 behave 框架的实现):
string (默认)
这是默认值,可以视为null或exact解析器。它不解析参数,并通过字符串相等来匹配步骤名称。
parse (基于: pypi_parse)
提供了一个简单的解析器,用类似 {param:Type} 的可读语法取代步骤参数的正则表达式。该语法受 Python 内置的 string.format() 函数启发。步骤参数必须在步骤定义中使用 pypi_parse 的命名字段语法。命名字段会被提取出来,可选择进行类型转换,然后用作步骤函数参数。支持通过extra_types传递的类型转换器进行类型转换。
cfparse (扩展: pypi_parse, 基于: pypi_parse_type)
提供了一个带有“Cardinality Field”(CF)支持的扩展解析器。只要为 cardinality=1 提供了类型转换器,就会自动创建相关基数的缺失类型转换器。支持像这样的解析表达式:
{values:Type+}(cardinality=1..N, many){values:Type*}(cardinality=0..N, many0){value:Type?}(cardinality=0..1, optional)
支持类型转换(如上)。
re
这将使用完整的正则表达式来解析子句文本。您需要使用命名分组 (?P<name>...) 来定义从文本中提取并传递给 step() 函数的变量。类型转换只能通过 converters step 装饰器参数完成(见下面的示例)。
默认解析器是 string,因此只需一对一匹配关键字定义。
除 string 以外的解析器及其可选参数的指定方式如下:
对于cfparse解析器
from pytest_bdd import parsers

@given(
    parsers.cfparse("there are {start:Number} cucumbers", extra_types={"Number": int}),
    target_fixture="cucumbers",
)
def given_cucumbers(start):
return {"start": start, "eat": 0}对于re解析器
from pytest_bdd import parsers

@given(
    parsers.re(r"there are (?P<start>\d+) cucumbers"),
    converters={"start": int},
    target_fixture="cucumbers",
)
def given_cucumbers(start):
    return {"start": start, "eat": 0}
例子:
Feature: Step arguments
    Scenario: Arguments for given, when, then
        Given there are 5 cucumbers

        When I eat 3 cucumbers
        And I eat 2 cucumbers

        Then I should have 0 cucumbers
代码如下所示:
from pytest_bdd import scenarios, given, when, then, parsers


scenarios("arguments.feature")


@given(parsers.parse("there are {start:d} cucumbers"), target_fixture="cucumbers")
def given_cucumbers(start):
    return {"start": start, "eat": 0}


@when(parsers.parse("I eat {eat:d} cucumbers"))
def eat_cucumbers(cucumbers, eat):
    cucumbers["eat"] += eat


@then(parsers.parse("I should have {left:d} cucumbers"))
def should_have_left_cucumbers(cucumbers, left):
    assert cucumbers["start"] - cucumbers["eat"] == left
示例代码还显示了传递参数转换器的可能性,如果您需要在解析器之后对步骤参数进行后处理,这可能会很有用。
您可以实现自己的步骤解析器。它的界面非常简单。代码可以如下所示:
import re
from pytest_bdd import given, parsers


class MyParser(parsers.StepParser):
    """Custom parser."""

    def __init__(self, name, **kwargs):
        """Compile regex."""
        super().__init__(name)
        self.regex = re.compile(re.sub("%(.+)%", "(?P<\1>.+)", self.name), **kwargs)

    def parse_arguments(self, name):
        """Get step arguments.

        :return: `dict` of step arguments
        """
        return self.regex.match(name).groupdict()

    def is_matching(self, name):
        """Match given name with the step name."""
        return bool(self.regex.match(name))


@given(parsers.parse("there are %start% cucumbers"), target_fixture="cucumbers")
def given_cucumbers(start):
    return {"start": start, "eat": 0}
通过given步骤覆盖 fixture
如果你的测试设置数据结构复杂,那么依赖注入并不是万能的。有时,需要这样一个给定步骤,即只在特定测试(场景)中必须更改 fixture,而在其他测试中则保持不变。为此,在 given装饰器中存在一个特殊参数 target_fixture:
from pytest_bdd import given

@pytest.fixture
def foo():
    return "foo"


@given("I have injecting given", target_fixture="foo")
def injecting_given():
    return "injected foo"


@then('foo should be "injected foo"')
def foo_is_foo(foo):
assert foo == 'injected foo'Feature: Target fixture
Scenario: Test given fixture injection
Given I have injecting given
Then foo should be "injected foo"
在这个例子中,现有的 fixture foo 将被 given 步骤 I have injecting given 覆盖。
有时,让 when 和 then步骤提供 fixture 也很有用。一个常见的用例是我们必须断言 HTTP 请求的结果:
# content of test_blog.py

from pytest_bdd import scenarios, given, when, then

from my_app.models import Article

scenarios("blog.feature")


@given("there is an article", target_fixture="article")
def there_is_an_article():
    return Article()


@when("I request the deletion of the article", target_fixture="request_result")
def there_should_be_a_new_article(article, http_client):
    return http_client.delete(f"/articles/{article.uid}")


@then("the request should be successful")
def article_is_published(request_result):
    assert request_result.status_code == 200
# content of blog.feature
Feature: Blog
Scenario: Deleting the article
Given there is an article
When I request the deletion of the article
Then the request should be successful
多行步骤
与 Gherkin 一样,pytest-bdd 也支持多行步骤(又称 Doc Strings)。但它的方式更简洁、功能更强大:
Feature: Multiline steps
    Scenario: Multiline step using sub indentation
        Given I have a step with:
            Some
            Extra
            Lines
        Then the text should be parsed with correct indentation
如果一个步骤的第一行之后的下一行相对于第一行缩进,则该步骤被视为多行步骤。然后通过添加更多带有换行符的行来简单地扩展步骤名称。在上面的示例中,给定步骤名称将为:
'I have a step with:\nSome\nExtra\nLines'您当然可以使用全名(包括换行符)注册步骤,但是,使用步骤参数并捕获第一行之后的行(或其中的一些子集)似乎更实用:
from pytest_bdd import given, then, scenario, parsers


scenarios("multiline.feature")


@given(parsers.parse("I have a step with:\n{content}"), target_fixture="text")
def given_text(content):
    return content


@then("the text should be parsed with correct indentation")
def text_should_be_correct(text):
    assert text == "Some\nExtra\nLines"
场景快捷方式
如果您有一组相对较大的 feature 文件,那么使用场景装饰器手动将场景绑定到测试会很无聊。当然,使用手动方法,您可以定制额外参数化测试,为测试函数命名,记录它等,但在大多数情况下并不需要这样做。相反,您希望通过使用 scenarios 来自动递归绑定在 features 文件夹中找到的所有场景。
from pytest_bdd import scenarios

# assume 'features' subfolder is in this file's directory
scenarios('features')
这就是您需要做的所有事情,以绑定在 features 文件夹中找到的所有场景!请注意,您可以传递多个路径,这些路径可以是feature文件或feature文件夹。
from pytest_bdd import scenarios

# pass multiple paths/files
scenarios('features', 'other_features/some.feature', 'some_other_features')
但如果您需要手动绑定某个场景,而让其他场景自动绑定怎么办?只需以 "normal" 方式编写您的场景,但确保在调用 helper 之前完成scenarios。
from pytest_bdd import scenario, scenarios

@scenario('features/some.feature', 'Test something')
def test_something():
    pass

# assume 'features' subfolder is in this file's directory
scenarios('features')test_something场景绑定将保持手动,features文件夹中找到的其他场景将自动绑定。
场景大纲
场景可以参数化以覆盖多种情况。这些在 Gherkin 中称为场景大纲,变量模板使用尖括号编写(例如
Example:
# content of scenario_outlines.feature

Feature: Scenario outlines
    Scenario Outline: Outlined given, when, then
        Given there are <start> cucumbers
        When I eat <eat> cucumbers
        Then I should have <left> cucumbers

        Examples:
        | start | eat | left |
        |  12   |  5  |  7   |
from pytest_bdd import scenarios, given, when, then, parsers


scenarios("scenario_outlines.feature")


@given(parsers.parse("there are {start:d} cucumbers"), target_fixture="cucumbers")
def given_cucumbers(start):
    return {"start": start, "eat": 0}


@when(parsers.parse("I eat {eat:d} cucumbers"))
def eat_cucumbers(cucumbers, eat):
    cucumbers["eat"] += eat


@then(parsers.parse("I should have {left:d} cucumbers"))
def should_have_left_cucumbers(cucumbers, left):
    assert cucumbers["start"] - cucumbers["eat"] == left
组织您的场景
您拥有的 features 和 scenarios 越多,其组织问题就变得越重要。您可以通过以下方式组织您的场景:
- 按语义组组织文件夹中的 feature 文件:
features
│
├──frontend
│  │
│  └──auth
│     │
│     └──login.feature
└──backend
    │
    └──auth
        │
        └──login.feature
这看起来不错,但是如何只针对某个 feature 运行测试呢?由于 pytest-bdd 使用 pytest,bdd 场景实际上是正常的测试。但测试文件与 feature 文件是分开的,映射由开发人员决定,因此测试文件结构可能看起来完全不同:
tests
│
└──functional
   │
   └──test_auth.py
      │
      └ """Authentication tests."""
        from pytest_bdd import scenario

        @scenario('frontend/auth/login.feature')
        def test_logging_in_frontend():
            pass

        @scenario('backend/auth/login.feature')
        def test_logging_in_backend():
            pass
为了选择要运行的测试,我们可以使用 测试选择技术。问题是您必须知道测试是如何组织的,仅了解 feature 文件组织是不够的。Cucumber 使用 tag 作为对 features 和 scenarios 进行分类的方式,pytest-bdd 支持这种方式。例如,我们可以有:
@login @backend
Feature: Login

  @successful
  Scenario: Successful login
pytest-bdd 使用 pytest markers 作为给定场景测试的标签存储,因此我们可以使用标准测试选择:
pytest -m "backend and login and successful"
feature 和 scenario 标签与标准 pytest markers 没有什么不同,并且@符号会自动删除以允许测试选择器表达式。如果您希望 bdd 相关的标签与其他测试标记区分开来,请使用 bdd 这样的前缀。请注意,如果您将 pytest 与该 --strict 选项一起使用,则 feature 文件中提到的所有 bdd 标签也应该出现在 pytest.ini 配置的 markers 设置中。另外,对于标签,请使用与 python 兼容的变量名,即以非数字开头,仅下划线或字母数字字符等。这样您就可以正确地使用标签进行测试过滤。
通过实施 pytest_bdd_apply_tag 钩子并返回 True,你可以自定义如何将标记转换为 pytest 标记:
def pytest_bdd_apply_tag(tag, function):
    if tag == 'todo':
        marker = pytest.mark.skip(reason="Not implemented yet")
        marker(function)
        return True
    else:
        # Fall back to the default behavior of pytest-bdd
        return None
测试设置
测试设置在 Given 部分中实现。尽管这些步骤是强制执行的,以应用可能的副作用,但 pytest-bdd 正在尝试利用基于依赖项注入的 PyTest fixture ,并使设置更具声明性。
@given("I have a beautiful article", target_fixture="article")
def article():
    return Article(is_beautiful=True)
PyTest target fixture "article"将获取返回值,任何其他步骤都可以使用它。
Feature: The power of PyTest
    Scenario: Symbolic name across steps
        Given I have a beautiful article
        When I publish this article
这里 When 的步骤会获得 article 的值并执行 publish()。
@when("I publish this article")
def publish_article(article):
    article.publish()
许多其他 BDD 工具包在全局上下文中运行并产生函数副作用。这使得实现这些步骤变得非常困难,因为依赖项仅作为运行时的副作用出现,而不是在代码中声明。"publish article" 步骤必须相信 article 已经在上下文中,必须知道它存储在那里的属性的名称、类型等。
在 pytest-bdd 中,您只需声明它所依赖的步骤函数的参数,PyTest 将确保提供它。
通过 BDD 的设计,仍然可以以命令式方式应用副作用。
Feature: News website
    Scenario: Publishing an article
        Given I have a beautiful article
        And my article is published
功能测试可以重复使用为单元测试创建的 fixture 库,并通过应用副作用对其进行升级。
@pytest.fixture
def article():
    return Article(is_beautiful=True)


@given("I have a beautiful article")
def i_have_a_beautiful_article(article):
    pass


@given("my article is published")
def published_article(article):
    article.publish()
    return article
通过这种方式,副作用被应用到我们的 article 中,PyTest 确保需要 "article" fixture 的所有步骤都将收到相同的对象。"published_article" 和 "article" fixture的值是相同的对象。
fixture在 PyTest 范围内仅评估一次,并且它们的值被缓存。
背景
通常情况下,要覆盖某些功能,您需要多个场景。而且这些场景的设置会有一些共同部分(如果不相等的话)是合乎逻辑的。为此,有了 Background 这个概念。pytest-bdd 实现了Gherkin 背景的 feature。
Feature: Multiple site support

  Background:
    Given a global administrator named "Greg"
    And a blog named "Greg's anti-tax rants"
    And a customer named "Wilson"
    And a blog named "Expensive Therapy" owned by "Wilson"

  Scenario: Wilson posts to his own blog
    Given I am logged in as Wilson
    When I try to post to "Expensive Therapy"
    Then I should see "Your article was published."

  Scenario: Greg posts to a client's blog
    Given I am logged in as Greg
    When I try to post to "Expensive Therapy"
    Then I should see "Your article was published."
在这个例子中,所有来自背景的步骤都将在所有场景自己的给定步骤之前执行,为多个场景在单个 feature 中准备一些共同设置提供了可能性。关于Background的最佳实践,请阅读Gherkin的 Background使用技巧。
在 "Background" 部分中只能使用 "Given" 步骤。禁止使用 "When" 和 "Then" 步骤,因为它们的目的与行动和消耗结果相关;这与 "Background" 的目标相冲突——准备系统进行测试或“将系统置于已知状态”,如 "Given" 所做的那样。上面的语句适用于严格的 Gherkin 模式,该模式默认启用。
重复利用fixture
有时场景会为现有的 fixture 定义可以继承(重用)的新名称。例如,如果我们有 pytest fixture:
@pytest.fixture
def article():
   """Test article."""
   return Article()
然后可以使用 given() 将该 fixture 与其他名称一起重用:
@given('I have a beautiful article')
def i_have_an_article(article):
   """I have an article."""
重复使用步骤
在父 conftest.py 中定义一些公共步骤,然后在子测试文件中简单地期望它们是可行的。
# content of common_steps.feature

Scenario: All steps are declared in the conftest
    Given I have a bar
    Then bar should have value "bar"
# content of conftest.py

from pytest_bdd import given, then


@given("I have a bar", target_fixture="bar")
def bar():
    return "bar"


@then('bar should have value "bar"')
def bar_is_bar(bar):
assert bar == "bar"# content of test_common.py
@scenario("common_steps.feature", "All steps are declared in the conftest")
def test_conftest():
pass测试文件中没有步骤的定义。它们是从父 conftest.py 收集的。
默认步骤
以下是在pytest-bdd内部实现的步骤:
假如(given)
- trace:通过
pytest.set_trace()进入pdb调试器
当(when)
- trace:通过
pytest.set_trace()进入pdb调试器
那么(then)
- trace: 通过
pytest.set_trace()进入pdb调试器
在pytest-bdd中,不论是given、when还是then步骤,都提供了一个名为trace的默认步骤。当你在Gherkin语法的feature文件中使用该步骤时,它会触发pdb调试器。这意味着,无论在哪个阶段,当你需要对某一步进行调试时,都可以利用这个trace步骤方便地进入调试模式。
如果你想在某个特定的步骤中进行调试,可以采用以下方法:
1.在feature文件中插入trace步骤
在你想要进行调试的地方,无论是在Given、When还是Then段落,加入trace步骤。例如:
Feature: Some feature description

Scenario: Some scenario description
    Given some initial condition
    When I perform some action
    Then trace
    And I expect some result
2.运行测试
使用命令行运行你的测试。你可以使用标准的pytest命令,例如:
pytest path_to_your_test_file.py
3.开始调试
当测试运行到trace步骤时,它会自动进入pdb调试模式。此时你可以使用pdb的命令进行调试,例如:
n:执行下一行代码c:继续执行直到下一个断点q:退出调试器p some_variable:打印某个变量的值
4.结束调试
完成调试后,使用c命令或q命令退出调试模式,测试将继续执行或完全停止。
提示:在进行调试时,确保你已经熟悉了
pdb的基本命令,这样你可以更有效地进行调试。
Feature 文件路径
默认情况下,pytest-bdd 会使用当前模块的路径作为查找 feature 文件的基本路径,但可以在 pytest 配置文件(即pytest.ini、tox.ini 或setup.cfg)中通过在bdd_features_base_dir键中声明新的基本路径来改变这种行为。该路径被解释为相对于 pytest 根目录。您也可以按场景覆盖基本 features 路径,以便覆盖特定测试的路径。
pytest.ini:
[pytest]
bdd_features_base_dir = features/
tests/test_publish_article.py:
from pytest_bdd import scenario


@scenario("foo.feature", "Foo feature in features/foo.feature")
def test_foo():
    pass


@scenario(
    "foo.feature",
    "Foo feature in tests/local-features/foo.feature",
    features_base_dir="./local-features/",
)
def test_foo_local():
passfeatures_base_dir参数也可以传递给 @scenario 装饰器。
避免重新输入feature文件名
如果您希望在测试文件中定义场景时避免重新键入 feature 文件名,请使用 functools.partial. 这将使您在测试文件中定义多个场景时变得更加轻松。例如:
# content of test_publish_article.py

from functools import partial

import pytest_bdd


scenario = partial(pytest_bdd.scenario, "/path/to/publish_article.feature")


@scenario("Publishing the article")
def test_publish():
    pass


@scenario("Publishing the article as unprivileged user")
def test_publish_unprivileged():
    pass
您可以在 Python 文档中了解有关functools.partial的更多信息。
程序化步骤生成
有时,您的步骤定义会更容易自动化,而不是一遍又一遍地手动编写它们。例如,当使用像pytest-factoryboy这样自动创建 fixture 的库时,这种情况很常见。为每个模型编写步骤定义可能会成为一项乏味的任务。
为此,pytest-bdd提供了一种自动生成步骤定义的方法。
技巧是将 stacklevel 参数传递给 given, when, then,step 装饰器。这将指示他们将步骤 fixture 注入适当的模块中,而不是仅仅将它们注入调用者框架中。
让我们看一个具体的例子;假设您有一个类 Wallet,其中每种“货币”都有一定数量:
# contents of wallet.py

import dataclass

@dataclass
class Wallet:
    verified: bool

    amount_eur: int
    amount_usd: int
    amount_gbp: int
    amount_jpy: int
您可以使用 pytest-factoyboy 自动为此类创建模型 fixture:
# contents of wallet_factory.py

from wallet import Wallet

import factory
from pytest_factoryboy import register

class WalletFactory(factory.Factory):
    class Meta:
        model = Wallet

    amount_eur = 0
    amount_usd = 0
    amount_gbp = 0
    amount_jpy = 0

register(Wallet)  # creates the "wallet" fixture
register(Wallet, "second_wallet")  # creates the "second_wallet" fixture
现在我们可以定义一个函数 generate_wallet_steps(...) 来为任何 wallet fixture 创建步骤(在我们的例子中,它将是 wallet 和 second_wallet):
# contents of wallet_steps.py

import re
from dataclasses import fields

import factory
import pytest
from pytest_bdd import given, when, then, scenarios, parsers


def generate_wallet_steps(model_name="wallet", stacklevel=1):
    stacklevel += 1

    human_name = model_name.replace("_", " ")  # "second_wallet" -> "second wallet"

    @given(f"I have a {human_name}", target_fixture=model_name, stacklevel=stacklevel)
    def _(request):
        return request.getfixturevalue(model_name)

    # Generate steps for currency fields:
    for field in fields(Wallet):
        match = re.fullmatch(r"amount_(?P<currency>[a-z]{3})", field.name)
        if not match:
            continue
        currency = match["currency"]

        @given(
            parsers.parse(f"I have {{value:d}} {currency.upper()} in my {human_name}"),
            target_fixture=f"{model_name}__amount_{currency}",
            stacklevel=stacklevel,
        )
        def _(value: int) -> int:
            return value

        @then(
            parsers.parse(f"I should have {{value:d}} {currency.upper()} in my {human_name}"),
            stacklevel=stacklevel,
        )
        def _(value: int, _currency=currency, _model_name=model_name) -> None:
            wallet = request.getfixturevalue(_model_name)
            assert getattr(wallet, f"amount_{_currency}") == value

# Inject the steps into the current module
generate_wallet_steps("wallet")
generate_wallet_steps("second_wallet")最后一个文件,wallet_steps.py 现在包含我们的 "wallet" 和 "second_wallet" fixture 的所有步骤定义。
我们现在可以定义这样的场景:
# contents of wallet.feature
Feature: A feature

    Scenario: Wallet EUR amount stays constant
        Given I have 10 EUR in my wallet
        And I have a wallet
        Then I should have 10 EUR in my wallet

    Scenario: Second wallet JPY amount stays constant
        Given I have 100 JPY in my second wallet
        And I have a second wallet
        Then I should have 100 JPY in my second wallet
最后是一个将所有内容组合在一起并运行场景的测试文件:
# contents of test_wallet.py

from pytest_factoryboy import scenarios

from wallet_factory import *  # import the registered fixtures "wallet" and "second_wallet"
from wallet_steps import *  # import all the step definitions into this test file

scenarios("wallet.feature")
Hooks
pytest-bdd公开了几个pytest钩子,这些钩子可能有助于在其基础上构建有用的报告、可视化等:
pytest_bdd_before_scenario(request, feature,
 scenario)
- 在执行场景之前调用pytest_bdd_after_scenario(request, feature, scenario)- 在执行场景后调用(即使其中一个步骤失败)pytest_bdd_before_step(request, feature, scenario, step, step_func)- 在执行步骤函数并评估其参数之前调用pytest_bdd_before_step_call(request, feature, scenario, step, step_func, step_func_args)- 在使用评估参数执行步骤函数之前调用pytest_bdd_after_step(request, feature, scenario, step, step_func, step_func_args)- 步骤函数成功执行后调用pytest_bdd_step_error(request, feature, scenario, step, step_func, step_func_args, exception)- 当step函数执行失败时调用pytest_bdd_step_func_lookup_error(request, feature, scenario, step, exception)- 当步骤查找失败时调用
测试报告
BDD测试的核心价值之一在于它能够与非技术团队成员清晰地沟通,因此,一个清晰、直观的测试报告对于整个测试过程来说是非常重要的。为此,CukeTest为您提供了内置的多种主题样式的测试报告,确保每当您完成pytest-bdd项目运行时,系统都能为您自动生成一个高品质的测试报告。
值得注意的是,原生的pytest-bdd框架并不直接支持向报告中嵌入文本或图片。为了弥补这一不足,CukeTest对其进行了功能扩展。
报告附件
在pytest-bdd的测试流程中,往往需要为测试报告附加一些额外的信息,例如检查点细节、文本描述、截图或其他关键数据。为了满足这一需求,CukeTest提供了一个特定的功能:request.attach方法,使用户能够在测试步骤中将文本、图像或其他数据以附件形式嵌入到测试报告中。
request是pytest框架的一个特殊对象,它提供了关于当前测试请求的丰富信息。在pytest-bdd的上下文中,通过request对象,我们不仅可以访问当前测试的细节,还可以插入自定义行为,如附加数据到测试报告。
使用方法:
request.attach(target, MIMEType?)参数详解:
- target:
string或Buffer类型,要作为附件的数据内容。 - MIMEType: (可选参数)
string数据类型 - 表示附件的MIME格式。默认格式是text/plain,即纯文本。如果要插入图片,请使用image/png;对于JSON数据,请使用application/json。 - 返回值: 该方法不返回任何内容。
在一个特定的测试步骤中,可以多次调用
request.attach()方法。这样做将允许您在同一步骤中嵌入多个附件。
添加文本附件
文本附件默认采用MIME类型为 text/plain进行存储。然而,您还可以为其指定其他的MIME类型,以适应不同的需求。
添加图像附件
CukeTest允许您以Buffer或base64编码格式将图像嵌入到测试报告中。这种方式特别适用于嵌入测试过程中的屏幕截图或其他相关图片。特别是在使用CukeTest进行桌面应用自动化测试时,每一个控件对象都内置了.takeScreenshot()方法,从而使得您可以轻松地获取控件的截图并作为附件添加到测试报告中,进而帮助团队更好地了解控件的实时状态和行为。
下面的示例展示了如何在测试中嵌入不同类型的附件:
@when(parsers.parse('搜索CukeTest安装路径下的{relative_path}'))
def search_path(get_install_path, relative_path, request):
    dest_path = os.path.join(get_install_path, relative_path)
    model.getEdit("Edit").set(dest_path)

    # 添加文本附件
    request.attach(f'目标路径:{dest_path}')

    # 添加图片附件
    request.attach(model.getList("List").takeScreenshot(), "image/png")
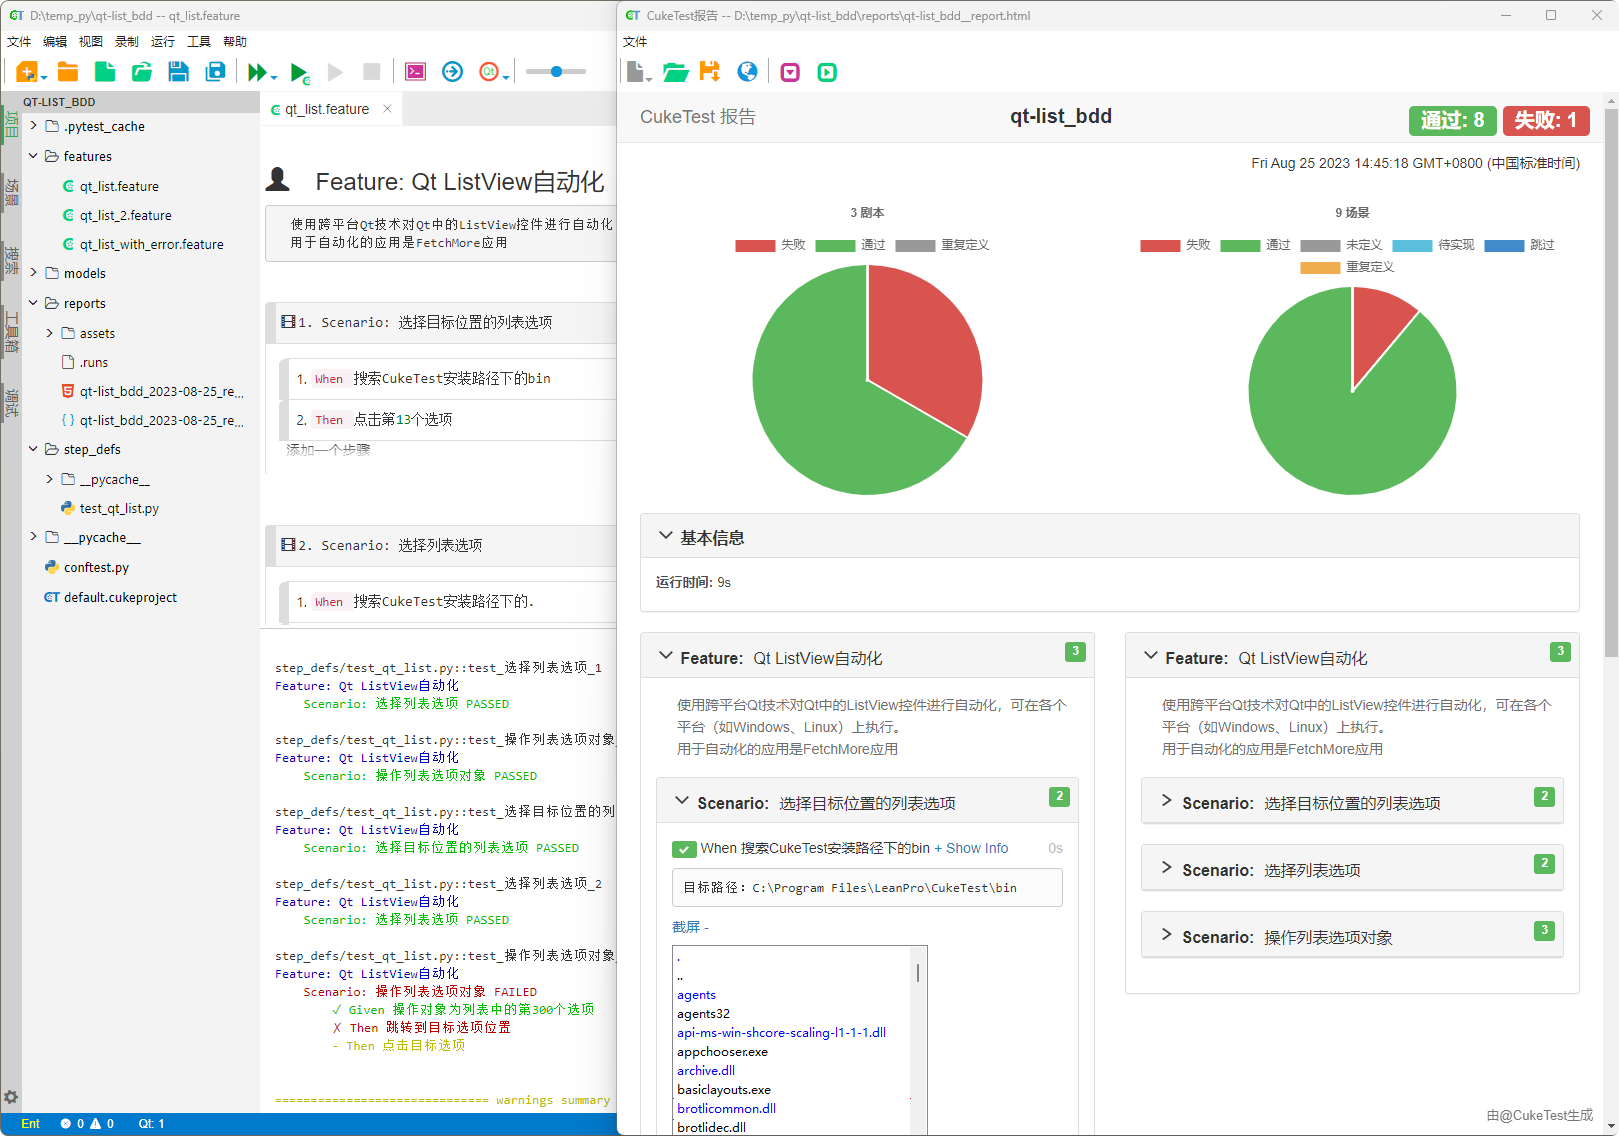
在整个测试执行期间,终端将实时显示脚本的运行信息,这些信息包括剧本、场景以及每个步骤的成功或失败状态。
这种实时反馈不仅为测试人员提供了即时的进度概览,而且在定位和修复潜在问题时起到了关键作用。通过终端输出,测试人员可以迅速地确定哪些步骤成功了,哪些步骤可能遭遇问题,并据此进行后续的分析与调整。
下图展示了一个典型的pytest-bdd测试报告,其中详细列出了各项测试活动的结果:
结合图形化的测试报告和终端的实时输出,CukeTest确保您能够全方位地掌握测试流程的每一个细节。这不仅有助于提高测试的准确性,而且在长期的维护和迭代中,能够为团队提供宝贵的参考信息,简化问题定位与修复的流程。
本文基于pytest-bdd的官方文档整理。如需进一步探索或查阅原版英文文档,请前往官方项目页面:https://github.com/pytest-dev/pytest-bdd。